 |
|
Planning
The rehearsal dinner, wedding and reception will be planned. Your photography of it must also be planned if it is to be successful. It should begin as soon as you commit to being their photographer. To keep track of everything, I recommend setting up a file, in a folder or notebook so you have all your records in one place.Coordinating with Bride, Groom, Family, and Clergy
A number of things need to be discussed with the bride and groom, the person officiating, and sometimes immediate family of the bride and groom. The purpose is to establish everyone's desires, determine the ground rules within which you will have to operate, and resolve any conflicts between what they want and what you can do well in advance of the wedding.Establishing Their Expectations of You
What do the bride, groom and their families want for wedding photographs? What will you deliver to them after the wedding? Who will you deliver it to? Nearly always this is the bride. How and where will you do it? Will you handle reprints of the proofs for them? What is the turnaround time for processing to proofs and reprints? Who will pay for the film, processing and any reprints? When will you shoot formal portraits: before the wedding? afterward? at the reception? Avoid temptation and deflect requests by friends and relatives to let them see your photographs before the bride and groom see them! Professionals will not do this unless it is pre-arranged and permission granted by the bride and groom beforehand. I cannot emphasize this strongly enough. The photographs are the bride's and groom's and they should decide which ones others get to see.Establishing Your Expectations of Them
The coordination with bride and groom (and their families) needs to be a two way dialogue. Is there anything you want them to provide or make available for you? At the wedding? At the reception? Do you need some space allocated at the reception for any special photographs to be done there? Who will coordinate with the venues where the wedding and reception will be held if anything special is needed there? Make it known that you intend to be the "official" photographer, that others can make photographs if they wish (and you will allow some time for this), but that you will be in charge of setting up the formal portraits the bride and groom desire. This is also the time to ask for a general sequence of events during the wedding day.If there are to be formal photographs made before the wedding ceremony, you need to establish when the people involved need to be present. You need to be finished with any formal photography to be done before the wedding ceremony at least 30 minutes before it begins; 40 minutes is even better. This is when guests start arriving in numbers and any music before the wedding starts. Back up the timetable from there. If the bride and groom haven't thought about it, they need to know that the wedding party is usually at the location where the ceremony will be held at least 2 hours beforehand.
Coordinating with Person Officiating the Wedding Ceremony
Most clergy will not allow flash photography during a service as they feel it distracts and detracts from a religious ceremony. This ban usually begins just after the bride (and possibly groom) is presented, and usually ends at "the first kiss." Some of this will depend on the sequence of the ceremony. Occasionally, "the first kiss" occurs after the wedding vows and before a communion in which you may be allowed a couple of shots of the kiss, but must then wait until the end when you may begin shooting again. You need to know the sequence of the ceremony and what the photography policies are of the person officiating the ceremony. You also need to know if there are any specific policies regarding photography inside the church, synagogue, mosque or venue in which the ceremony will take place. There may be areas around an altar or elsewhere in the venue which you cannot use or should not enter. Make a list of what you can and cannot do. It is best if you can have your discussion directly with the person who will officiate along with at least the bride and groom. If you cannot, give a list of questions to the bride and groom to have answered for you. It is important that you, the bride and groom all know what these are.General Sequence of a Wedding Day (significant events)
This is only a general sequence. The exact order of events may vary slightly during the reception. Establish with the bride and groom the exact sequence they are planning.The custom of the groom not seeing his bride on the wedding day before she appears at the processional has relaxed some. Ask how they feel about doing at least some of the formal portraiture before the ceremony. Even if they want to abide by the "we cannot see each other beforehand" rule, you can still do other portraiture involving the bride or groom without the other one present. If you plan to do that, remember to have enough time between when they will be completely dressed and about 40 minutes before the ceremony. I recommend using a time window of 1-1/2 hours to 45 minutes before the ceremony. It is customary to have the bride secluded and completely out of sight while guests are arriving and being seated. Your can finish any shots after the ceremony (and everyone has exited) that were intended to be done beforehand. The following is a generic sequence that applies to most weddings. The exact sequence for your wedding shoot may vary in places. Walk through this with the bride and groom (and person officiating the ceremony if you can) and rearrange it to fit your needs.
Now that you have established an initial sequence of significant events you can create the "Must Have" list.Preparation for the wedding ceremony (bridal party getting dressed) Formal portraiture of the wedding party and families of the bride and groom (an optional time to do at least some of the portraiture) Parents and grandparents greeting guests before the ceremony Prelude music Seating of grandparents and parents Processional (wedding party) Wedding ceremony Recessional (wedding party) Parents and grandparents escorted to exit Guests exiting (sometimes there is a receiving line during the exit) Formal portraiture of the wedding party and immediate families of the bride and groom (if not done or completed before the wedding) Bride and groom exiting to go to the reception Bride and groom departing (by vehicle) for the reception Wedding party announced arrival at the reception location Bride and groom announced arrival at the reception location Toasting the bride and groom by the Best Man and other important guests Feasting (this can vary from simple hors d'oerves to a formal sit-down meal) Other portraiture at the reception (an optional time to do large groupings of bride's and groom's extended families) Cutting the wedding cake Bride and groom toasting each other (typically done right after the cake is cut) First Dance (bride and groom often followed by fathers and and mothers of the bride and groom) Tossing the bride's bouquet Removing the bride's garter Tossing the bride's garter Decorating the "getaway" car Bride and groom departing the reception (includes saying good-bye to parents and grandparents) The "Must Have List"
The "Must Have List" identifies those photographs you must make during the rehearsal, rehearsal dinner (if you shoot the rehearsal events), wedding and reception. This list is also a "must have" for you too. It is fundamental to establishing what photographs the bride and groom desire, and for you to negotiate what you can realistically deliver; both in technical requirements to create them and the cost of doing so. This list, if created and carried through properly, will prevent questions afterward about why you didn't make certain shots and "wasted film" on others. Many brides (and grooms too) have specific photographs in mind they want you to make. Often it's something special they have seen in someone else's wedding book, and can easily be something you have never seen. This is how you discover what they are. It also gives you a planning tool for the amount of film you will need and how to organize your day (where to be and when). It is important to review this list with the bride and groom after they have filled it out. I strongly recommend determining what photography restrictions the person officiating the wedding ceremony has, and any further restrictions the wedding or reception venues have before making this list.During the research for my cousin's wedding, I found a "Must Have List" on a bridal web site that was five single-spaced pages long with two columns on each page! It had every event, no matter how insignificant, from the bride waking up on her wedding day, to washing the dishes and sweeping the hall after the reception was over. It included individual portraits of anyone remotely related and an enormous section of specific reception candids. In my opinion it was an entirely unrealistic "In Your Dreams List" and would have required an army of photographers with a truck load of film to get it all. A professional cinema film crew with several cameras rolling continuously the entire day would have a better chance. It required about a thousand photographs. As you create the list with the bride and groom, keep it realistic. Game it out with a general sequence to identify any trouble you might have being in the right place at the right time. The usual trouble spots are requirements to be in two places simultaneously, not enough time to get from one place to another, or the desire for some "trick" or "special effects" photography requiring equipment you do not have (and don't want to buy for their wedding).
The "VIP" (Very Important People) List
Along with a "Must Have List" you also need to establish who the VIP's other than the bride, groom and bridal party are. This typically includes parents, siblings, children, grandparents, and any great-grandparents who will be present that are not part of the bridal party. Sometimes there is a very special friend, cousin, aunt or uncle with whom the bride or groom is very close. You need to know who they are; it will be very important to photograph them while they are there. A very real consideration for photographs of grandparents and great-grandparents at weddings is these are often that last decent ones a family has of them. This was one of my omissions and I almost missed out on photographing an aunt of the bride. The one I did get wasn't the best. If I had known there would have been more to ensure a very good one.
Along with this VIP list you need to establish who not to group together. Not something you might think of! However, there are such things as bitter divorces and family feuds; this is real life. If there are people that cannot tolerate being near one another you need to identify who they are. This is so you can avoid trying to put them into the same grouping. It is not that uncommon for the parents of the bride or groom to be divorced and possibly remarried. If so, are they amicable? How will you group them for formal portraits? If you are also family, you may have a good feel for this already, but you still need to discuss it with the bride and groom!
The following links will take you to a modified version of the form I created to help make a "Must Have List" with my cousin. It includes a section at the beginning to identify the VIP's. Hint: It's not five pages long with double columns, it's about three pages, and the first page is devoted to identifying the wedding party, their families, and any VIP's. To help you out, this list is on a separate page you can easily print, both in HTML so you can see it in your browser, and in an unformatted ASCII text file you can download. You can open the text file using your favorite word processor to make and print your list. The list includes spaces for special requests. (Use the "Back" button on your browser to get back here.):
HTML "Must Have List"Remember, it is very important to review this list with the bride and groom after it is filled in. If you can sit down and go through it together, all the better (I did this via email). Then go back through the sequence laid out and rearrange that if necessary. If you are doing this very early (more than about a month beforehand), don't be too surprised if something else comes to mind from the bride or groom and your list grows slightly. If a request is made to add to the list, incorporate it, but remain realistic about what you can do and how much it will cost you! If there's anything you know you cannot do, especially "trick" or "special effects" work be up front about it and provide a simple explanation why. Try to think of alternatives that you can do that will accomplish approximately the same thing. If there's something about which you have doubts or that seems risky for decent results, then be up front with this too, and let them know you'll try it first to see if you can make it work. In these cases, you don't want their wedding to be the experiment! If the risk is due to possible reflections or lighting angles that you cannot control, let them know that you'll attempt it, but that it may not work, and work on a "backup" that may not be identical but will accomplish something similar.=== Back to Top of "Planning" ===
Photography Equipment
Equipment was discussed in general in a previous section. This section explores it in further detail. Included are some suggestions you can use as a starting point to perfect what works best for you while you practice.The KISS Principle
"KISS" = Keep it simple, stupid! That's right, you want to keep it simple. Too much complexity increases risk of something failing. It will bog you down by consuming more time during setup, changeover or tear down. While you're assembling, adjusting or storing equipment, you cannot make photographs. If it takes too much time, you could miss something. Use a setup as simple as you can that will still achieve the photographs you want.Bodies
Some professional wedding photographers use medium format equipment for the formal portraiture; a few use it for the entire wedding and reception. Many use 35 mm exclusively. With proper film selection and professional printing, you can make good photographs using a 35 mm SLR. Why an SLR? The viewfinder is WYSIWYG allowing you to compose quickly; much faster than with the average viewfinder or rangefinder camera. It can be done with a Leica M6 or Contax G2 (both are professional grade bodies with parallax correcting viewfinders), but even with them it will be more difficult. The most important aspects of a camera body are reliability, being intimately familiar with it, and being able to work its basic controls quickly. If you have one of the newer SLR bodies with all manner of program options, try to find one mode you can set it to well before the wedding and leave it that way for the duration of the day (the KISS principle). It can be very difficult to read an LCD panel during a reception with the lights turned down for dancing. You don't want to get stuck trying to scroll through option settings while something is happening you should be photographing, or changing a setting for a specific photograph and forgetting to change it back.Lenses
I freely admit I'm not much of a zoom lens user. For me a zoom takes too much time to adjust both focal length and focusing. Furthermore, the only zoom I have is an f/3.5~4.5 which creates a dimmer viewfinder and is more difficult to focus in low light. I occasionally use it outdoors in bright light. My primes are a faster f/2 or f/2.8 with f/1.2 and f/1.4 standard 50 mm's, and it is faster for me to use my "shoe leather" for zooming. If you have a decent zoom that covers at least 50-75 mm, can adjust the focal length and focusing quickly in low light levels, and are comfortable with it, by all means use it. I do recommend practicing with it in typical reception lighting levels when lights are dimmed for dancing. If you use a manual focus body, check out how fast you can focus it. If you use an auto-focus body, check to see if the AF system can lock properly on what you want it to. What's important is you cover at least the 50 mm standard length with a lens that you can work quickly and accurately even under those conditions.If you plan to use a zoom it should extend out to between 75 mm and 100 mm. A 35-70 or 35-105 zoom can be used, but I don't recommend using any prime wide angle lens or zooming under 50 mm. Even a modest 35 mm wide angle can get you into trouble quickly with perspective and with portraiture. It can easily result in unnatural looking building interiors and facial features. The focal lengths most commonly used for traditional studio portraiture are between 50 mm and 135 mm with the longer end above 100 mm for tight "head shots." It is possible to do an entire wedding with nothing more than a fast 50 mm.
If you want to use more than one lens, think very carefully about when you would change lenses. It should occur only when you know you will have time to do it and can properly store the lens being removed. You don't want to get caught fumbling around with lenses when events are happening quickly and miss critical shots as a result. Lens changing always creates an opportunity to drop one and damage it! If you must use more than one lens, keep it to no more than two (the KISS principle); the first a 50 mm and the second a modest telephoto (between 85 mm and 100 mm). Better yet, see if you can get away with using only one lens when you practice.
Batteries
If you are not accustomed to shooting a dozen rolls in one day, all with flash, then you may be surprised by the battery usage. Because of this, most professionals use rechargeable NiCad or the newer NiMH cells for on-camera flash units that use "AA" cells. There are some additional advantages of NiCad and NiMH cells over Alkalines. They can put out much higher current enabling recharging the flash faster and they hold voltage until they are very near complete discharge. The newer NiMH cells also have about a third more capacity (meaning a third more flashes) than most NiCad's. Alkalines will start to drop in voltage at about half to two-thirds through their life. The result is longer flash recharge times, especially near the end of their life. If you have NiCad or NiMH cells in the size used by your flash I recommend using them. Regardless of the type cell you decide on, I recommend having at least three complete sets of new cells for each flash unit you plan to use (one set inside the flash plus two more sets). If you cost this out, you may find buying sets of NiMH and a charger at a discount department store is not much more expensive than buying enough Alkalines. It's a decision you'll have to make. If you use Alkalines, plan on changing them out when the flash recharge time becomes too long instead of waiting until they're completely dead[Note: DO NOT recharge NiMH cells in a NiCad charger and DO NOT recharge NiCad cells in a NiMH charger. Some of the newer chargers are switchable from one to the other. If you have one of them, ensure the switch is in the proper position for the cells you are recharging. Do not mix types or capacities (measured in mAH) either. Recharging either NiCad or NiMH in the wrong charger can result in them leaking inside your flash unit later. This nearly always destroys the flash.]Unless you have a very, very old camera, it will use batteries also. As with batteries for your flash, I recommend having at least three new sets of cells for your camera (one set inside the camera plus two more sets).These are only guidelines. Different cameras and flash strobes consume batteries at very different rates. Yours may consume batteries faster. If so, you may require more than three sets of batteries for them. As with film, this is one item you do not want to run out of. Your past experience and practice should be used to determine how many batteries to have.
Tripods
A tripod is not required unless you plan to make photographs using available light during the ceremony. If you are planning on this, a tripod and a cable release for the camera shutter are a necessity. The tripod should be sturdy to hold the camera without shaking, twisting or bending, and tall enough that the camera is elevated sufficiently above the heads of people who will be sitting directly in front of where it is set up. The height necessary for this is usually about five feet. The backs of some pews, and peoples heads and shoulders is fine, as long as it doesn't block a clean view of the altar area or include any so close (and consequently large) that they are a distraction in the photographs. The tripod also requires a "quick release" head so you can put the camera body on and take it off quickly.Plan on shooting any available light photographs for no longer than about the first two-thirds of the ceremony. You will need time to dismount the camera from the tripod (and get it out of the way if it's blocking an aisle), possibly change the lens, reset lens aperture and shutter speed for flash use, turn the flash strobe back on, and reposition yourself for the "First Kiss" and recessional. Depending on exactly when it occurs during the ceremony, the last possible shots are often the first half of the ring exchange and vows that go with them. Knowing the sequence of the ceremony and how much time each part takes is valuable in planning this.
=== Back to Top of "Planning" ===
Exposure and Lighting
Exposure Settings
You may be aware already the latitude of portrait film is wider than most other negative films and even wider than transparency. Latitude is the difference between how much light produces pure white and pure black on a particular film (sometimes expressed in EV or "stops"). You want to use this to your advantage in keeping some detail in white wedding dresses and dark tuxes within the same image. It should not become an excuse for sloppy exposure. If you are shooting outdoors, use the method(s) that works for you in setting proper exposure for the image you are making.Indoors with flash you need the shutter speed set to one that provides proper flash X-sync. This shutter speed varies from camera to camera. On older SLR bodies, the typical X-sync is 1/60th second. On newer SLR bodies, it can be as low as 1/90th and as high as 1/250th second. This is the fastest shutter speed you can use with electronic flash. See your camera manual for what the X-sync speed is. Many camera bodies with auto exposure capability automatically switch to this speed whenever a dedicated flash is mounted and turned on. I've found it wise to set the shutter speed ring or knob to the X-sync speed anyway. Shutter speed knobs and rings typically have the X-sync speed marked differently than the others (often a different color or a lightning bolt next to it).
When you use a flash, some portion of the light exposing the film is "ambient" lighting . . . the existing light. The rest, usually the great majority, is from the flash. The ratio of how much comes is ambient and how much is provided by the flash depends on how much ambient light there is, film speed and to a much lesser extent, the shutter speed. The amount of light at a given distance from a flash falls off with inverse square of the distance. Twice the subject distance receives 1/4th the light. Three times receives 1/9th the light and four times the distance receives 1/16th the light. If you've ever photographed someone fairly close in large room, with a lot of space behind them, you've likely encountered a rather dark background. This is due to the light falloff from the flash. The more ambient light that's used, the lighter the more distant background. The less ambient light that's used, the darker the more distant background. If it's a very dimly lit room and you're fairly close to the subject, a distant background can look nearly pitch black in the photograph.
There are several methods to avoid cave-like backgrounds when using flash in large spaces:
- Turn on more room lights (usually not an option)
- Increase film speed (tradeoff with increased grain and less enlargement capability)
- Open up lens aperture (tradeoff with depth of field)
- Drag the shutter at a speed slower than the X-sync speed (a sophisticated technique; highly discouraged unless you're already experienced at doing this)
The last method of dragging the shutter depends on being able to do this with your camera without fouling up the camera's TTL flash control. I cannot do it with mine and remain in TTL flash mode. It requires switching the camera to completely manual exposure control and switching the flash from TTL to Auto using the light sensor built into the flash, not the TTL metering in the camera body. There's also risk of slight blur if the the camera isn't steady enough. That said, the standard flashbulb F-Sync and M-Sync shutter speeds were 1/30th or 1/25th second. Flashbulbs had a much longer burn duration than electronic flash. Although a faster shutter speed such as 1/50th or 1/60th would usually sync, the shutter would close before the bulb stopped burning wasting a significant amount of light from the flashbulbs. Using 1/30th requires a solid stance, excellent camera holding technique, and steady hand though! Before electronic flash, somehow photographers survived using 1/30th with flashbulbs, but it wasn't without a little camera shake risk. I don't recommend dragging the shutter to a speed longer than X-Sync unless you're already highly experienced at doing it, know exactly how to set up both camera and flash for it, and can do it blindfolded without having to think about it much. Too much opportunity for error that you cannot discover until the proofs come back. That leaves lens aperture with its depth of field tradeoff.
For most traditional wedding photographs, both portraits and candids, the expectation is everything will appear reasonably in focus. The exception is close-up, 1/3 portraiture (head, shoulders, and maybe chest), for which a blurred background is usually more desirable. If at all possible, an aperture no wider than f/5.6 should be used to keep enough background behind the subject(s) in reasonable focus. The following table shows the depth of field for 35 mm small format using:
- 50 mm standard lens;
- f/4, f/5.6, f/8 and f/11 apertures (those most likely to be used with flash);
- 2-30 foot critical focus distances; and
- 0.025 mm maximum circle of confusion (largest diameter point on the film that will appear as an in-focus point on a print)
f/4
DOF (ft)f/5.6
DOF (ft)f/8
DOF (ft)f/11
DOF (ft)Min Max Min Max Min Max Min Max F 2 ft 2.0 2.0 1.9 2.1 1.9 2.1 1.9 2.1 O 4 ft 3.8 4.2 3.8 4.3 3.7 4.4 3.5 4.6 C 6 ft 5.6 6.5 5.5 6.7 5.3 7.0 5.0 7.5 U 8 ft 7.3 8.8 7.1 9.2 6.7 9.9 6.3 10.9 S 10 ft 8.9 11.4 8.6 12.0 8.1 13.2 7.5 14.9 12 ft 10.5 14.0 10.0 15.0 9.3 16.9 8.6 19.9 D 14 ft 12.0 16.8 11.3 18.3 10.5 21.1 9.6 26.1 I 16 ft 13.4 19.8 12.6 21.9 11.5 26.1 10.5 34.1 S 18 ft 14.8 23.0 13.8 25.9 12.5 31.9 11.3 44.8 T 20 ft 16.1 26.4 14.9 30.2 13.5 38.7 12.0 59.7 A 22 ft 17.4 30.0 16.0 35.1 14.4 47.1 12.7 82.1 N 24 ft 18.6 33.8 17.1 40.5 15.2 57.3 13.3 119.5 C 26 ft 19.8 38.0 18.0 46.5 16.0 70.3 13.9 194.4 E 28 ft 20.9 42.4 19.0 53.3 16.7 87.2 14.5 419.7 30 ft 22.0 47.2 19.9 61.1 17.4 110.1 15.0 Inf The table shows that f/4 has a marginal DOF with a 50 mm focal length and f/5.6 has a much better DOF behind the critical focus distance. Use f/4 only if you absolutely must to get a proper exposure at the longer distances; and only for long distances. Opening up the lens any further than f/4 is not recommended at all. Lens aperture selection when using flash in a large dimly lit space is a tradeoff between having enough depth of field while getting some ambient light to keep distant background from going totally black. The challenge for most non-professionals is getting enough light from flash indoors to consistently work at f/5.6 and not wait an eternity for the flash to recycle.
Lighting equipment
Lighting is one of the most important aspects of your photographs. Light is the only thing that exposes film; it's what creates a photograph. Unless the wedding and reception you will be photographing is outdoors, you will be using a flash. There are four critical aspects to using flash at weddings and receptions: generating enough light, preventing "red-eye," not creating large, deep shadows around and behind people, and having a fast recycle time that allows making several photographs in quick succession. Many professional wedding photographers use two or more portable, high powered studio strobes on light stands, with umbrellas or soft boxes, for the on-location formal portraits. Unless you're willing to spend a small fortune on lighting equipment, and learn how to use it properly, this is not an option. You can do a very good job using on-camera flash, if it is used correctly.Flash Power
The first consideration is generating enough light for proper exposure. Working distances from camera to subject(s) will be greater at times than for the bulk of "consumer" flash photographs typically made in the home. The integral flip-up flash found on P&S's (point-and-shoot), and newer consumer SLR's is not powerful enough. Most are barely enough for "in-home" photography if you are using fast film. Canon rates the integral flash on the Elan 7E with a guide number (GN) of approximately 43, and Nikon rates the N80's integral speedlight at 39 (GN's are for ISO 100 in feet). This is not even enough for 10 feet using ISO 160 film or 15 feet using ISO 400 at an f/5.6 aperture setting. The following table is also in "The Right Stuff" section. It shows the GN rating required of a flash strobe (ISO 100 in feet) for ISO 160 and ISO 400 films, using apertures of f/4, f/5.6, f/8 and f/11, with working distances of 5 - 30 feet.
Minimum Flash Guide Number Rating (ISO 100 in feet) for
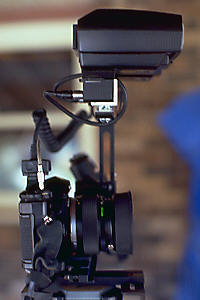
Film Speed, Aperture and Distancef/8 f/4 f/5.6 f/8 f/11 5 feet 10 feet 15 feet 20 feet 25 feet 30 feet The table shows that a working distance of 25 feet and aperture setting of f/5.6 requires a GN 111 flash for ISO 160 film, and a GN 70 flash for ISO 400 film. You need to use an external flash with a GN rating of 100 or more (ISO 100 in feet), preferably between 125 and 150. This provides "overkill" that can cut flash recycling to about half the time required from "full dump" and some protection for the occasional photograph with 25 - 30 foot subject distance. If you already have an external flash in this range, great, especially if it is "dedicated" to your SLR system and can be controlled by your SLR body. If not, this doesn't mean you have to buy a Metz 45 CL-1 or CL-4 dedicated flash, unless you're flush with money to burn and want one anyway. One of the most popular "workhorse" auto flashes is the Vivitar 285HV. An alternative is Sunpak's 383. Both are under $100 new, very reliable, operate on 4 "AA" cells, can run at reduced output levels, and have sensors built into the flash for operating in an "auto" mode. Neither are dedicated to specific camera systems though. Depending on the film speed and power level selected, their "auto" mode requires you to set a specific lens aperture. I don't recommend buying one of these used unless it is in very nearly "like new" condition and that it's relatively new (versus looking like new) to ensure that it has a lower flash trigger voltage. Many flashes made prior to the mid-1980's have high trigger voltages that will destroy modern camera electronics; the older Vivitar 283 and 285HV are among them, as are most old Sunpak's (the new one's are OK). For my first wedding I used two identical dedicated flashes for my system with a GN of about 105 each. The first practice session with ISO 160 film convinced me how marginal using only one flash was. To get more flash power I built a homemade dual flash bar with a pair of hot shoes on it and ran the pair of them in tandem (see the two bracket photos in this subsection). Note this does not double the GN. A pair with the same GN operated in tandem increases the GN by a factor of 1.4 (the square root of two approximated).
Eliminating Red-Eye Risk
Red-eye in photographs is caused by bright light reflecting off of the retina at the back and inside the eye, then back to the camera lens (and film). The retina is loaded with capillaries carrying blood. The red color is from the color of the blood in the capillaries. Red-eye risk is highest when the source of light is closest to the camera lens and when the subject's pupils (the part that controls how much light gets into the eye) are open widest in low light. Note that alcohol consumption tends to dilate pupils making them wider than they would normally be. Combine the very low ambient light levels often found for dancing at a reception with even moderate alcohol consumption, and all the conditions are in place with your subjects for a high risk of red-eye.Although controlling ambient lighting levels during a reception is unlikely and controlling alcohol consumption is impossible, you can control how close the flash is to your lens. Red-eye risk is reduced by moving the flash strobe(s) farther from the camera lens. Move it far enough and the red reflection is either blocked by the eye's pupil, or it passes outside the view of the camera lens.
Shadow Control
The position of an integral hot shoe on nearly all SLR's is on the prism housing directly over the lens, if you are holding the camera horizontally. This places shadows cast by the flash behind and lower than the subject. How much lower depends on the height of the flash, camera to subject distance, and how far the subject is in front of a vertical background object. By positioning a subject far enough in front of any vertical background objects, the shadow can be dropped out of view as long as the floor or ground directly behind the subject is also out of view.
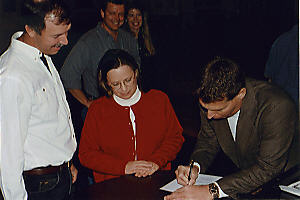
Subject positioning is more controllable and sufficient distance from vertical backgrounds may be possible for the formal portraits, but not always. Furthermore, many standard wedding photographs (both portraits and candids) call for a vertical composition. If the flash is in an integral hot shoe on the prism housing, it ends up directly to the side of the lens, not above it. This casts a shadow to the side of a subject parallel to the lens axis; it does not drop. The photograph to the left is a prime example of this shadowing.
Even though this is a horizontal shot with the flash elevated slightly above the lens axis, it was mostly to its right. Background distance behind the subjects could not be controlled. Noticeable shadows are found along the left edges of them. Fortunately these are not deep shadows on a darker background. If they were, the outline of the subjects' dark hair would be lost in the shadows giving an unnatural shape to their heads.
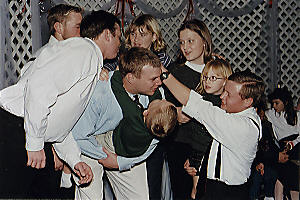
Compare this to the photograph on the right. It's a similar situation with a light colored, highly reflective wall directly behind the subjects. As with the other photograph, the distance between subjects and the background cannot be controlled. The flash strobe was kept above the lens. Even though some shadow is visible below their hands and the knife, the bulk of the shadowing is behind them and slightly lower. This photograph was made using a flash bracket.
Flash Brackets
The optimal position of a flash above the lens is about 8-12 inches for both red-eye prevention and shadow control. The most basic type of flash bracket is the simple flash handle. Most are a vertical handle with a horizontal plate extending out from the base. Often the handle can detach from the base. The base is attached to the base plate of the camera using its tripod screw socket. Since the shutter release and winder are operated with the right hand, the handle is mounted to the left side of the body as you're holding the camera. This allows operating controls with the right hand while holding the camera with the left. A flash handle places the strobe head about 45 degrees diagonally above and to the side of the lens axis This is a compromise that prevents the strobe from being directly to the side of the lens whether the camera is horizontal or vertical. Although there will be some shadows to the side of subjects, the shadows will be lower, and it requires paying more attention to proximity of subjects to backgrounds. Flash handles are favored by many photojournalists for their simplicity.
Building on the flash handle concept is the "flip flash" style of bracket. Similar to a flash handle, this has a hinged arm at the top of the handle that extends over the top of the camera body. The flash is attached to the hinged arm directly above the lens. When the camera is turned vertical, the hinged arm is flipped 180 degrees to keep the the flash head over the lens. Along with a hinged arm to flip the flash, most are used much like a flash handle with some form of grip on the left side of the camera body.
Even more sophisticated are brackets that allow rotating the camera inside the bracket. The bracket and flash never change orientation, only the camera does on a rotating platform near the base of the bracket. The flash position and mechanism that allows camera rotation are adjusted to keep the lens directly under the flash head whether the camera body is horizontal or vertical. A left-hand grip on the bracket is recommended for use with these, and a built-in cable release on the grip helps greatly when the camera is turned vertical. The left hand can hold the camera/bracket and trip the shutter while the right positions the camera horizontal or vertical (plus focuses the lens and winds the film if it is a manual focus, manual wind body). I found these brackets the easiest to use.
How to connect the flash strobes to the camera body
For dedicated OEM flash units made for use with the camera body, most systems have a cord with a male shoe at one end that fits the camera hot shoe. The other end of the cord has either female hot shoe that can be mounted on a bracket, or a plug that fits a socket on the flash. For non dedicated flash units such as the Vivitar 283 or 285HV, or the Sunpak 383, the flash can be connected to the camera body by a PC cord. Unfortunately, most newer consumer camera bodies do not have a PC socket. This requires an aftermarket accessory that slides into the hot shoe and has a PC socket on the side; these are readily available at any major camera store. There are numerous ways to connect a remotely mounted flash to a camera body. Which will work best for you depends on your specific camera, flash unit and bracket.I recommend using some type of bracket even if it's a simple aftermarket flash handle. The primary reason is elimination of any red-eye risk by moving the flash farther away from the lens. A sturdy, generic aftermarket flash handle is the least expensive method and provides better overall shadow control for mixed horizontal/vertical shooting than a flash mounted in the camera's hot shoe, although it is a compromise. [Note: OEM dedicated flash handles can be more expensive than other types of brackets.] The "flip flash" is more expensive than a generic flash handle, but provides better shadow control. The "camera rotating" types are the most expensive, do not provide any better shadow control than a "flip flash," but most are easier to use (depending on your camera and flash). Whatever the type of bracket you use, practice with it so you can switch from horizontal to vertical and back quickly!
=== Back to Top of "Planning" ===
Film
Along with the equipment you use, the type of film is just as important. A typical bridal dress is white. Men's clothing is often dark. Your photographs will be of people. Mix these together with the wrong film and you will blow out the white dress to a blotch of pure white, lose detail in dark clothing (tuxes) to blotches of pure black, and skin tones will not be flattering. General purpose consumer films do not work very well with this mix. I have yet to find one that can do all three well. Professional portrait films are specifically designed for greater latitude, better skin tones, and finer grain for larger prints than the grocery store rack film. You've been asked to photograph the wedding because the bride and groom believe you can do better than someone simply showing up with a camera in their hands. Using a professional portrait film will make a difference in the results. All three major film makers, Agfa, Fuji and Kodak make excellent professional films suitable for wedding work. They are not that expensive compared to premium consumer films either. If you are unfamiliar with them, you will need to use at least a roll or two when you practice your formal photography. The following are the portrait and wedding films used by professionals; use the ISO 160 films if at all possible:If you do not have a source for these films, a good one in the U.S. with excellent prices is B&H Photo Video in New York. They have a stellar reputation and are used by many professional photographers for all manner of equipment and supplies.
- Agfa
- Portrait 160
I have not used this film, but some professional wedding photographers do.- Fuji
- NPS 160
- NPH 400
These are similar to Kodak's Portra 160NC and Portra 400NC.- Kodak
- Portra 160NC
- Portra 400NC
- Portra 160VC
- Portra 160VC
I recommend the NC. It is slightly finer grained and the color not quite as saturated as VC. NC is similar to Fuji's NPS and NPH, and is preferred by more professional photographers for wedding work. VC is used more often for glamour, fashion and other types of portraiture. I do not recommend Portra 800; its grain is too coarse for large prints.=== Back to Top of "Planning" ===
Processing Labs
Who will process the film and make the prints is equally important as selecting the proper film type. Prints are photographs of the negatives. They can be botched just as negatives can be botched when you make a photograph, even if the negatives are superb. You require an excellent, extremely reliable lab to develop the film and make the prints; one that will extract the best of each image you make from each negative. Do not use a "corner drugstore" one-hour lab.Digression about why you shouldn't use a consumer lab:If you have not used any professional labs near you, or don't know who they are, make a list of them from the Yellow Pages in your telephone directory. If you live in a small city (as I do), you should also look for pro labs in a directory for the nearest major city. Then look for the local portrait studios and wedding photographers; you want the ones that are locally owned, not the "chain" or "franchise" operations. A large studio may do its own work in-house, but most do not. Call several, explain that you need to have some special, custom color printing done and ask what lab they use. Because reputation and business could be adversely affected by poor lab work, a local studio will use one that is highly reliable and very consistent. You want a consensus of what lab is the best. I don't recommend telling a professional studio you plan to photograph a wedding. That could immediately derail the conversation to all the reasons you shouldn't. Highlight the lab (or labs) that you get a consensus of recommendations for. This is the lab you will test with a roll or two of film to see if they live up to their reputation. If other labs are mentioned, note who they are too.
Consumer print paper is different from professional paper. As with film, it is general purpose and geared for what consumers usually like to see: bright, bold saturated colors and contrast. It's not made for portrait work. Depending on the specific paper used, it may not have the longer archival life of professional paper either. Even if the local "one-hour" can extract excellent focus and print exposure from their machine, the other primary problem is color balancing. Automated print machines have "channels" that can be set up for different types/brands of film. These provide initial gross adjustment of color balance. I seriously doubt that a consumer one-hour lab has any of its print machine channels set up for professional portrait film! The "monitor" systems found in them for tweaking color balancing are notoriously not calibrated or maintained well. Color balancing prints from different film rolls can easily end up with noticeable variation, and none of them may match the actual colors of the bridesmaids dresses. This is something the bride will notice! An excellent pro lab uses and meticulously maintains a color "analyzer," a much more sophisticated device for consistent, accurate color balancing. Every print should have its exposure and color balance controlled tightly enough that you should not be able to tell which roll of film it came from without matching prints to their negatives.=== Back to Top of "Planning" ===
If you have never photographed a complete wedding ceremony or reception before as the photographer, you need to practice. I presume it's why you are reading this tutorial. (OK . . . it might be out of sheer curiosity too.) If it turns out that you cannot practice shooting at a couple of actual weddings and receptions, then at least practice elements of it under similar conditions and circumstances. I was fortunate to be able to go to two wedding ceremonies and three receptions beforehand as a serious photographer. The experience gained was invaluable for shooting the real thing, and it allowed testing films, camera settings and lighting to improve technique with them.
Practice, Practice and More Practice
Gaining Wedding and Reception Experience
If you're lucky (as I was) you have several months to prepare and know a professional photographer who is willing to let you be an apprentice. If you personally know a professional wedding photographer . . . as a fellow photographer . . . don't be afraid to ask for advice, tutelage and if you can go to some weddings if only to watch how the work is done and ask questions afterward. (Some may be reluctant to let you shoot anything; it is their business and reputation.) If at all possible you want to work both the wedding ceremony, including the formals, and the reception for the candids. Take a small notebook. During "breathers" when you get a chance to sit down, and immediately after you get home, make brief notes about what types of photographs were done and when, any special photographs or locations from which they were done, and the types of poses used for the formal portraits.If you're not this fortunate, there are some alternatives.
If you regularly attend a church or synagogue, or if there is one nearby, find out when they have weddings scheduled. Attend a couple of the ceremonies as a "fly on the wall." Be there about 2 hours before the ceremony starts; watch and make notes about what the wedding photographer does. You don't want to become the photographer's "shadow" . . . watch from a distance. If you look like you belong there and unobtrusively act like you belong there without getting in anyone else's way, then everyone will think you belong there. If challenged by someone, simply tell them why you're there . . . you're trying to learn wedding photography and just want to watch how the photographer works. If you're polite, stay out of the way, blend in and just watch, it's likely everyone else will be so busy nobody will think to ask who you are. Take a small notebook and make notes. Remember, you're there to watch the photographer, before, during and after the ceremony, not the wedding itself.
Another good method to practice formals, if you regularly attend religious services, is to attend the last service of the morning, wait until the sanctuary has completely cleared, and do portraits of them as if they were a wedding party. This requires some cooperation from your family, but you can get some portraits of them too.
Since most weddings are religious ceremonies held in a "place of worship" there usually isn't a problem going and watching. I don't recommend "crashing" a wedding reception uninvited. It's a "private party." Unless you're one of the invited guests or assisting a professional doing the photography, it would be difficult to observe what the photographer does anyway. There are some work-arounds for this. Any type of gathering of people will do, especially one held indoors. A school, church or synagogue "social;" a sports banquet; a large birthday party held for an adult in a reception hall or a graduation ceremony of some type. Anything held in a reception hall or banquet room that vaguely resembles a wedding reception (even if not with specific major events) with people gathered together will work. The object is to practice candids in a gathering of people much like a photojournalist would do.
Formal Poses and Composition
Traditional formal poses are typically made at the sanctuary or hall where the ceremony is held. Even though they have been traditionally done after the ceremony, many are doing at least some beforehand. The timing is a decision for the bride, groom, and the person officiating the ceremony. It also requires early access and any special preparations be accomplished about 1-1/2 hours before the ceremony, including everyone being photographed dressed and prepared. Any other activity (wedding, funeral, etc.) scheduled beforehand may preclude this although this is usually not a problem. By now you should have your list of the formal portraits you will be making. If they are to be split with some beforehand and some afterward, ensure you have annotated which will be done when.
Be flexible and ask the bride and groom to be also. People who should be in them can be late (this is the usual problem with beforehand photographs). Whatever cannot be done beforehand can be done immediately after the ceremony. Ensure the bridal party and anyone else who is to be photographed in the "formals" is told "where to be" and "when to be there" in advance. Hunting down a wayward family member can be a royal pain and make others impatient.
In any photograph containing the bride without the groom, she is the "anchor" around which any additional persons are arranged and a grouping is composed. Similarly, in any containing the groom without the bride, he is the anchor. If both are to be in the image, they are the anchor as a couple. There are different methods for building a grouping. I like to work from the "anchor" outward. Also recommended is starting with larger groupings first and working down to smaller ones that are a subset of the larger one. I found that doing family groupings, especially those with great-grandparents, grandparents, aunts and uncles before doing wedding party groupings works better in most cases. Extended family members (who are not part of the wedding party) have more of a tendency to wander off sooner and farther. The one exception may be sliding those groupings with small children in front of them if they are getting restless. Even though you go in with a planned sequence, maintain flexibility to rearrange it slightly, and stay tuned in to what is going on with everyone.
Plan on making multiples shots of groups. John's rule of thumb: one frame for every person in the group until you get to about four frames. SOMEONE will eventually blink!A tutorial on formal full-length portraiture with groupings would be a lengthy tutorial in its own right; much greater than the scope of this one. The following 18 chapter tutorial on "zuga.net" does a much, much better job on the subject than I ever could:Joe Zeltsman's free on-line portraiture lessons on Zuga.net!
If you have never done formal portraiture before, don't worry about the finer details with highly sophisticated lighting techniques. You probably don't have the necessary portable studio lighting, soft boxes, umbrellas and passive reflectors required for it anyway! Absorb the basics about posture, hands and arms, and how to build a group.
When people are standing, work from the feet up:
Even with seated subjects, start with the lower body first (legs and feet), then work up in a similar fashion. Remember that a grouping is individual portraits connected or tied together into a single image. Look at as many wedding albums as you can borrow and study the groupings. One last word on it: DON'T let any of the men clasp their hands together in front of themselves. In photographs, it looks like they're trying to hide a broken zipper (or worse if you have enough of an imagination).
- Position the feet properly
- Turn the body
- Position hands and arms
- Position the head last
- Take one last look at background and clothing, and scan hands/feet/heads to see if something has slipped out of place while positioning others.
Candids and Photojournalism
This is a completely different "ball game" from portraiture. I call it "working the crowd." My style is to capture people doing things, not just looking at the camera. This does take some timing!Some basic tips:
Test Design, and Testing Equipment and Film
- Look for where the action is and document it!
- This is a matter of personal style: I try very hard not to let people "engage the camera" (look directly at it) when doing candids. With the camera lens egaged, it's no longer "candid." Since it's not posed, it's not a portrait. It's neither, and usually doesn't work well.
- If people are talking to each other, try to position yourself so nobody's back is to you (from the side is OK) and wait until a "punch line" or someone finishes a sentence and people laugh of smile naturally. This can take a little patience and waiting.
- Don't try to do very many candids when people are eating. It is almost impossible to make flattering photographs of this.
- If a candid shot slips away because it just didn't work, just move on to another one. My hit rate is about one of two, or two of three attempts.
- Watch for the bride and/or groom saying goodbye to an early departing great-grandparent, grandparent, aunt or uncle, or to their parents near the end. These can be priceless moments; don't be afraid to ask them to hug again if you're there but think you missed the timing.
- Doing the cake cutting at an angle that's nearly a profile gets the cake, bride and groom. From the front, you usually get the cake, but the bride and groom are obscured by it. Usually the groom is taller and you can position them some. Get the groom on the far side (if he is taller). Ask them to start cutting into it and then STOP while you take two or three shots.
- Shooting the garter and bouquet from the side, halfway between the bride/groom and the singles waiting for the toss, has a better chance of getting both. Hit the shutter release just as the upswing starts. With your reaction time and the slight shutter delay for mirror movement, you should end up with it at or very near the release of the bouquet/garter. (This is as tough one.) Then swing very quickly for a shot of the mad scramble. If you have a manual winder as I do, wind immediately after the first one and swing around at the same time. As a backup, do an informal portrait of the pair that got the bouquet and garter afterward.
- Try sitting in a chair when photographing people dancing, especially if you're tall. This keeps you from looking down at the couple(s) and placing their heads too low in the frame. For the close dancing wait until they turn so their faces are showing. If people start dancing as a group in a circle, grab a chair, holler "make hole" and get in the middle! Works much better than shooting their backs from outside the circle.
- Keep track of how many frames you have left! If you're getting close to a major event (cake, toast, bouquet, garter, etc.) and only have a few frames left (four or less), wind it up as a short roll and load a new one. Nothing is more frustrating than needing one more shot in the middle of a critical event and having the winder stop in half-stroke at the end of a roll.
During your practice you will want to test setup of flash, lens(es) and film for suitability and to understand fully what results to expect from it. Most amateurs do not use everything the same way they would for the types of photographs they normally make.Some tips and recommendations:
- Use the events and situations in which you practice your formal portraiture and candids for testing film and equipment setup also.
- You don't need to shoot nearly as much film at someone else's wedding, or any other practice events, as you will at the wedding and reception you've signed up to shoot. One roll of 24 exposure should be sufficient; two at the most.
- Change or vary only one thing at a time if at all possible. You don't want to confound results from a test with multiple changes at one time.
- Start with your normal setup of body, lens(es) and film. If you are changing your flash setup, try that change first.
- Look at and analyze the initial results. Choose the next change based on what you think will make an improvement.
- Shoot at least one roll of the professional portrait film you have selected.
- Have at least one roll of the color negative film brand/type you've used most in the past developed with proofs printed by the pro lab you've selected. If you haven't used a pro lab before, you will likely have a pleasant surprise at what you get. If you don't like how they make the proofs, or how they do it, try talking to them about what options you may have with their processing or use a different pro lab with another roll.
- When you decide on a final setup of body, lens(es), lighting and film, shoot one last roll to verify it.
=== Back to Top of "Planning" === Reconnaissance and What to Look For
Knowing where various events will take place, how to get to them easily, where to park, and their general floor plan will allow you to plan your day, and how you want to set up various photographs. By now you should have any restrictions the person officiating the wedding has, plus any additional ones imposed by the venues in which events will take place. If at all possible, visit all of these places in advance. The best time is immediately after you have the first draft of the "Must Have List" so you can find anything special on the list that might be impossible to accomplish in their rehearsal dinner, wedding and reception venues. Even a day beforehand, if that's the best you can do, is better than walking into them sight unseen while events are happening the day of the wedding. The day before the wedding is too late to change the "Must Have List" but you can think about adjustments to your plan before you are trying to execute it.Rehearsal Dinner Venue
The rehearsal dinner is typically after the rehearsal, indoors, in the evening after sunset, and you will be using a flash. Take a body and all your lenses with you. If this is a restaurant or similar facility, find out exactly where the dinner will be served. Then look for the following:
- Where will you be able to park (how far will you have to carry your gear)?
- How big is the room and what are its dimensions (square, rectangular, long and narrow)?
- How many people will be in it and how crowded will this make it?
- Where is a "head table" typically located and how are other tables normally arranged for the number of people expected?
- Are there windows, mirrors, or other highly reflective objects, where are they located?
- Are there drapes or curtains that can cover any windows completely?
- Where is the sign outdoors; do they put the names of any special party on it?
- How would you do an outdoor photo of this building or place? At what time of day (look at where the sun will be)?
Highly reflective surfaces are the bane of a photographer using a flash. It can flare the flash right back at the camera lens unless you remain at an angle to it. Look for where these are, make note of them, and think about how you have to position yourself to keep this from happening. Put the lens(es) you plan to use on your camera body and look through the viewfinder to see how much you can take in from various positions in the room. Can the lens(es) you plan to use work for this? Don't give up too easily; remember the KISS principle! If they are impossible, do you have a different one you can use for the entire event? When thinking about an architectural shot of the venue, look at the direction the building faces and where the sun will be in the morning and afternoon. I don't recommend doing architecturals at mid-day. They are best done between dawn and mid-morning or mid afternoon and sunset. Between 10:00 AM and 2:00 PM is usually the worst time to do a building unless shadows of very tall structures right next to it preclude this. The best light direction for surface textures are at about a 30 - 60 degree angle to your view of the structure. You also want to avoid power lines, power poles, traffic lights and street signs, if at all possible. This can be a real challenge in an urban environment, and you may have to live with a compromise that doesn't have too much distraction from urban "clutter" while maintaining a reasonable lighting angle. If you have the equipment (tripod) and have done night cityscapes before, think also about a timed night shot (this can sometimes hide power lines). Look for a angles that can capture the building and its signs, especially if the venue puts the party name on the sign for the event. If there isn't an acceptable one, then plan on separate shots of the structure and its sign.
Occasionally the rehearsal dinner is done at someone's home (usually the groom's). This can get very crowded even if the dining room (or area that will be used for it) is large. However, most of the above list still applies.
Wedding Ceremony Venue
Most weddings are held mid-day to mid afternoon. A few are in the evening or at night. Time of day can make a difference. Take a body and all your lenses with you. Then look for the following:
Put the lens(es) you plan to use on your body and look through the viewfinder at the perspectives you will get from various locations. Look for where you will have to stage yourself to get shots of the bride entering during the processional, when she arrives at the front (to be given away by her escort), the "First Kiss" when that occurs, and during the recessional as the bride and groom first start down the aisle. Then look at the area you will have for doing the formal portraits.
- Where can you park (how far will you have to carry your gear)?
- How big is the room or sanctuary where the ceremony will be held (what is its shape)?
- Is there an aisle down the middle, or just down the sides; how wide is it?
- How far away can you back away from the altar steps (or where the vows will be taken), while centered on them, before you are into an immovable object?
- Are there windows anywhere, especially large ones? Where are they? Will there be lots of daylight coming through any of them at any time before, during or after the wedding ceremony, especially any direct sunlight that might create harsh shadows?
- Where do the bride and groom typically get ready for the ceremony, and where are the bride and her escort staged just beforehand?
- What doors are used for people entering and leaving?
- Are there windows, mirrors or other flat, highly reflective objects around or behind where the vows will take place?
- What is the length of the aisle the bride will use?
- How far is it from the location where the vows will take place to the back?
- Where will any special music or singing be performed?
- Are there areas around where the vows will be taken that you are not allowed to use or enter?
- How would you do an outdoor photo of this building or place? At what time of day (look at where the sun will be)?
- Where is the sign? Can it be included in the photo of the building and still be readable in the photograph?
- If it's an outdoor wedding, where will the sun be? If it's a clear sky, where will the shadows be?
- Where will you do the formal portraits? How wide and deep is it for placing people? Are there steps? Where will you have to position yourself for the largest and smallest groupings, including tight 1/3 portraiture (chest and head) of the bride and groom alone? Is where you will have to be lower than where the wedding party will be (will you need a stool or short step ladder)?
- Is there anything special on the "Must Have List" and how will you do that?
Reception Venue
Because of when most weddings are held, most receptions start in the late afternoon and run until well after dark. However, be aware that in the middle of Summer days are much longer. In some locales the sun may not set until 9:00 PM. If it's a late Fall, early Spring or Winter wedding, the days will be shorter. In some locales the sun may set as early as 5:00 PM. Make yourself aware of when sunrise and sunset will be, local time, where you will shoot the wedding, on the day you will shoot it. Then compare this to the planned times for the wedding and reception. The reconnaissance of the reception venue will be similar to that for where the wedding ceremony is being held, and just as you did there, have your body with all your lenses with you to look for good camera angles:
After you've done the planning on what you will have to photograph, selected film and lab, practiced the critical tasks you will have to perform, procured film and batteries for it, and done a reconnaissance, you should be ready for The Wedding Day!
- Where can you park (how far will you have to carry your gear)?
- How big is the reception hall or room (what is its shape)?
- Is there a logical location for a head table, or someplace where it is typically set up? How much room is there between it and where tables for guests will be?
- How far away can you back away from the head table while centered on it, before you are into a wall or another table?
- Are there windows, mirrors or other flat highly reflective objects anywhere, especially large ones? Where are they? Will there be lots of daylight coming through any of them at any time during the reception, especially any direct sunlight that might create harsh shadows? Are they behind where the head table will be? Are they behind or to the side of where the cake may be set up? Is there unattractive clutter on any of the walls that cannot be covered (wall outlets, light switches, emergency exits with handles and signs)? Where are they?
- What doors are used for people entering and leaving? Where is a receiving line usually set up?
- Where does a DJ usually set up, and where is that located compared to where a head table will be (how far away)?
- Is there a dance floor? Where is it? Where would you want to be to photograph, a couple dancing on it in low light?
- Are there any areas in this venue that you are not allowed to use or enter?
- How would you do an outdoor photo of this building or place? At what time of day (look at where the sun will be)?
- Where is the sign? Can it be included in the photo of the building and still be readable in the photograph?
- If it's an outdoor reception, where will the sun be? If it's a clear sky, where will the shadows be?
- Is there a location ideal for informal group portraits (if some family groupings have been requested)? How wide and deep is it for placing people? Are there steps? Where will you have to position yourself for the largest and smallest groupings, including tight 1/3 portraiture (chest and head) of a couple? Is where you will have to be lower than where the subjects would be (will you need a stool or short step ladder)?
- Is there anything special on the "Must Have List" and how will you do that?
=== Back to Top of "Planning" ===