 Photography
is the capturing of light reflected, refracted or diffracted by something
of interest (the subject) to record an image. Photography is about
light, and the "science" of photography is the study of light itself and
the tools used to capture and modify it to record the image desired.
For the longest time light was thought to travel in "rays." It is
useful at times to think of it in this light (pun intended), as in plotting
ray paths from a subject through a lens and onto film, but we know now
it does not. Within the past hundred years, physicists found that
light would sometimes exhibit wave properties and at other times particle
properties. Which is observed depends on the equipment and how it
is being used. Indeed, light is electromagnetic radiation that can
be detected with our eyes. As applied to photography, the model usually
used is the ray or particle. There are times when realizing it has
wave properties and the effect of these under certain conditions is important.
Photography
is the capturing of light reflected, refracted or diffracted by something
of interest (the subject) to record an image. Photography is about
light, and the "science" of photography is the study of light itself and
the tools used to capture and modify it to record the image desired.
For the longest time light was thought to travel in "rays." It is
useful at times to think of it in this light (pun intended), as in plotting
ray paths from a subject through a lens and onto film, but we know now
it does not. Within the past hundred years, physicists found that
light would sometimes exhibit wave properties and at other times particle
properties. Which is observed depends on the equipment and how it
is being used. Indeed, light is electromagnetic radiation that can
be detected with our eyes. As applied to photography, the model usually
used is the ray or particle. There are times when realizing it has
wave properties and the effect of these under certain conditions is important.
Color
A rainbow shows a range of colors generally described as red, orange, yellow, green, blue and violet. All of them together at full intensity create what we perceive as white and the absence of any of them is black. Actually, any color can be created from some combination of just three colors: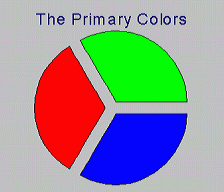
Thus your computer monitor is referred to as an "RGB" because it uses combinations of various intensities of the three to create all the other colors you see. All three at full intensity create white. Decrease the intensity of all three equally and this creates shades of Gray until there is none altogether and this is black. red, green and blue are called the "primary" colors.Red Green Blue
With black and white, the two are mutual opposites and this is fairly obvious. Each is the negative of the other. However, what are the opposites, or negative colors of the three primaries. This is not obvious (at least to most people). To sort this out start by taking all the possible combinations of two of the primary colors and mix them together with equal intensity. There are three possible combinations, thus the result is three more colors:
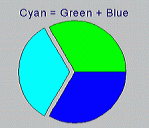
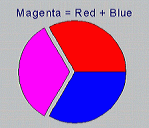
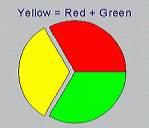
Cyan has a turquoise appearance, magenta is a form of purple, and these look like combinations of the primaries. However, red and green creating yellow is not inherently obvious. Cyan, magenta and yellow can be combined in various intensities to form any color also.
The "negative" of a color is white with all of that color removed. If all the red is removed from white, the only the green and blue is left. Green and blue create cyan, thus the negative color of red is cyan. Doing the same with the other two gives the negatives for all three primaries:
This relationships among all six of these colors is very important in understanding lens filters, films and print papers in photography. Combinations of red, green and blue; or of cyan, magenta and yellow dyes are how all the other colors you see in a photograph are created.Cyan is the negative of Red Magenta is the negative of Green Yellow is the negative of Blue
Why then does a color transparency (slide) show all the primaries clearly, but a color negative look a muddy orange with only a hint of the three negative colors? It turns out that the dyes used in color negatives are not the true negative colors. There is an orange mask added to color negative film when it is manufactured to filter the dyes in the negative to their true negative colors when prints are made. It is easier to do this and control exact color correction than to specify what exact filter the print processor should use on the enlarger for each film.
If equal half-intensities of red, green and blue (or of cyan, magenta and yellow) are combined a very special gray results that is half-way between white and black. It is referred to as "18% gray." Why it is 18% and not 50% is beyond the scope of this overview of color. It has a visual appearance of being half-way between the two and the term 18% gray is used heavily to describe the half-intensity of all three combined.
Color Temperature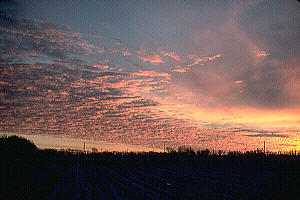
This discussion of color temperature will be referenced to average direct
sunlight as the films most commonly used are rated as "daylight" film.
Daylight is not daylight is not daylight. What we perceive as white
daylight is not necessarily truly white, at least to the film in the camera.
Those early risers who rise to see the dawn with the right cloud cover
are greeted with hues of reds followed by yellows and oranges. As
the dawn progresses the sky turns to blue. On a day overcast
completely with clouds there are no shadows, colors seem deep and sometimes
dull or gray. On a different day completely free of smog, dust or
haze, especially at high altitudes, the sky will be a deep blue.
On a clear day on the shady side of a building there will be lots of blue
sky but no direct sun. The human eye and brain make a marvelous team.
The brain adjusts for a light source (within limits) to register it as
"white" and convert its reflections from objects around us to something
close to what the hue would be if it were in average mid-day direct sunlight.
Film does not do this wonderful automagic conversion our brain does.
Consequently, if the light source differs in hue from average direct sunlight
(for daylight film), there will be a resulting tint or "cast" to the colors
in the photograph. Sometimes this is desired and can enhance a photograph.
At other times it can be an ugly surprise if it was not anticipated and
adjusted for.
Even more dramatic are indoor and night man-made light sources, especially bright ones which we normally perceive as white. They are not. Incandescent lamps (ones with glowing tungsten filaments) are actually yellow. An "available light" (no flash) photograph using "daylight" film under incandescent lighting will turn out with a very yellow cast to it. Arc, Xenon, and Sodium vapor all give off slightly different color compared to daylight. The generic fluorescent lamp gives off much more blue-green. To make matters worse with fluorescent lamps, there are all sorts of tints used by lamp manufacturers to modify the harsh blue-green they give off.
Because of these differences, because film is sensitive to them, and because film will not automagically adjust itself to a light source like our brains will, color is described as having a temperature relative to average direct sunlight. The temperature scale used to relate these light sources to each other is the Kelvin scale. The lower the temperature in Kelvin the more the photograph will have a yellow, orange and red cast. The higher the temperature in Kelvin the more it will have a blue cast. The truly odd part of all this is we think of higher temperature (more blue) as being warmer and lower temperature (more red) as cooler, but just the opposite is used to describe photographs. Those that have a yellowish-red cast to them are said to be "warmer." Ones with a bluish cast to them are said to be "cooler." The reason is for the emotional response we have to blue and red as being cool (icy) and warm (fiery) respectively. Just remember the actual Kelvin temperature used to measure how much it deviates from average daylight is the opposite of how we think about weather and air temperature.
Early morning sunrise and late evening sunset will have more red in
the daylight tending to make photographs slightly "warmer." Deep
shade (under large trees), heavy overcast, high altitude deep blue sky
(even in direct sun), and the shady side of a building on a clear day under
blue sky will have more blue in the daylight tending to make photographs
slightly "cooler." Situations that will cause severe color shift
are "available" light (no flash) under man-made lighting. Incandescents are noticeably yellow (less wattage = more yellow) and generic
fluorescents are usually a bluish-green. The problem with fluorescents
is the number of tints used by bulb manufacturers to modify the harsh color
given off if no tint is used. The tints are not standardized.
Other street, stadia and stage lights such as Carbon arc, Mercury vapor,
Sodium vapor and Xenon will cause all manner of color shifting ranging
from yellowish to greenish-yellows to purplish-blues. Professionals
shooting under these conditions using daylight films will normally shoot
test rolls in advance to determining what combinations of special filters
are required as no single, standard filter will work. Special filters
can be used for high wattage incandescent photo lights and generic (untinted)
fluorescent lamps. In addition there are special "tungsten" professional
films which can be used with incandescent lighting reasonably well provided
it is not low wattage. This is covered under lenses and films.
Incandescents are noticeably yellow (less wattage = more yellow) and generic
fluorescents are usually a bluish-green. The problem with fluorescents
is the number of tints used by bulb manufacturers to modify the harsh color
given off if no tint is used. The tints are not standardized.
Other street, stadia and stage lights such as Carbon arc, Mercury vapor,
Sodium vapor and Xenon will cause all manner of color shifting ranging
from yellowish to greenish-yellows to purplish-blues. Professionals
shooting under these conditions using daylight films will normally shoot
test rolls in advance to determining what combinations of special filters
are required as no single, standard filter will work. Special filters
can be used for high wattage incandescent photo lights and generic (untinted)
fluorescent lamps. In addition there are special "tungsten" professional
films which can be used with incandescent lighting reasonably well provided
it is not low wattage. This is covered under lenses and films.
Reflected, Refracted and Diffracted
Reflected
Reflected light is nearly all of what we see around us. It is light that "bounces" off of the objects that it strikes. Actually, it's not truly "bouncing" off of the object and this is the reason different objects (or substances) have different colors. In reflections we are seeing light exhibit its particle properties. Light "particles" are called "photons." When a photon strikes an atom or molecule the atom or molecule absorbs the energy from it with either increased vibration (why things get warmer in sunlight) or by the electrons going into a higher "orbit." Since most situation are not stable enough to keep all energy, some of it is given back off and the energy released is photons of light. The majority of objects can only have certain energy levels and moving from one to another releases photons with very specific amounts of energy. It is the energy level of the photon that determines what color of light it is. Thus, what is "absorbed" and kept either heats the object or provides energy for some other process and the specific energy levels of photons given back off give the object comprise its color. In taking photographs, we don't worry so much what happens at an atomic level, but tend to think of reflected light as rays bouncing off. How many photons are released back out determines the intensity and brightness of the color, not the color itself. Thus, with something like a green tree leaf the chlorophyl abosorbs energy at the upper and lower ends of the spectrum for the biochemical processes, but not from the middle giving it the green color which is radiated back out from the leaf. In Autumn when the leaf dies, the predominant substance remaining is carotene which abosorbs energy from the upper end of the spectrum and re-radiates the rest giving hues of yellows and reds at the visible spectrum's lower end.Refracted
Refracted light is not "bounced off" of something. It actually passes through an object, but in the process is bent into traveling in a different direction. In refraction, light is exhibiting its wave properties. This bending occurs at the boundary between two transparent objects (some reflection will occur also). The types of objects (and air is one of them) determines part of the overall rate of bending and is called the index of refraction. Within the overall rate of bending, different colors bend at slightly different rates. Thus when refraction occurs with light of more than one specific color, it will emerge as a band of colors. Understanding what refraction is and the fact that it separates colors is important in understanding some aspects of lenses and lens design, as well as the purpose for lens and filter coatings. The boundary of primarily air and glass, and inside the lens between two pieces of glass sandwiched together (sometimes different types of glass) causes refraction. Refraction is the principle behind how a lens focuses the image on the film.Diffracted
Diffraction also bends the direction of light. Even though this is also a result of its wave properties, what has caused it to bend and some of the effect seen in its bending is different. Diffraction occurs when light brushes past the edge of something, especially a very sharp edge. That which brushes against the edge of the object is the light that bends. It does not cause the colors to separate, but will cause bands of light to result. Sometimes these bands are very small, but can result in fuzziness in a photograph. More is discussed about diffraction and lens diaphragms in particular in the section about lenses.Incident
The light photographed is that which is normally reflected by the scene of interest (unless one is photographing the source of light itself). This light had to come from somewhere to be reflected. Incident light is the light falling on scene of interest from the light source itself.Polarized
This is purely the wave phenomenon of light. We perceive a 3-dimensional universe. Unless it is a very, very special light source, the light will be radiated with its waves in all directions: horizontal, vertical and all the diagonals in-between. When reflected from a very flat, and especially highly reflective surface such as glass or water, most of the reflected light waves will be in a particular direction. This is called polarized light. Most very bright glare from flat reflective surfaces will be polarized. The photographer can take advantage of this property by using a polarizer filter to reduce the amount of light with its waves in a specific direction or polarity. More is discussed about polarizer filters in the section about lenses.Light Meter
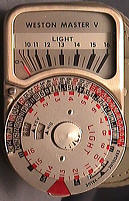 Light meters
measure the intensity of light. The most common use for one is to
measure the reflected light arriving at the camera from the scene of interest.
The internal metering built into cameras measures reflected light.
Most meters give an overall average reading of the reflected light intensity,
the method of averaging varying depending on the meter. Some (especially
older ones) will do a simple average; other (generally newer ones) can
give more weight to the center or less weight to the upper portion of a
scene. Weighted averaging is now very much a standard for the internal
meters found in camera bodies to keep the intensity reading from being
excessively skewed by something very bright or very dark near the edge
of the scene.
Light meters
measure the intensity of light. The most common use for one is to
measure the reflected light arriving at the camera from the scene of interest.
The internal metering built into cameras measures reflected light.
Most meters give an overall average reading of the reflected light intensity,
the method of averaging varying depending on the meter. Some (especially
older ones) will do a simple average; other (generally newer ones) can
give more weight to the center or less weight to the upper portion of a
scene. Weighted averaging is now very much a standard for the internal
meters found in camera bodies to keep the intensity reading from being
excessively skewed by something very bright or very dark near the edge
of the scene.
One special form of reflected light intensity measurement is is the "spot" reading. Spot readings measure the intensity of a small portion of a scene. Spot readings are normally performed to find the how much light is being reflected by the brightest and darkest regions of a scene. The photographer can then perform whatever averaging among the various regions is desired. Another use for spot readings uses an 18% gray card. This is a special card colored 18% gray. If it is placed in the scene of interest and a spot reading taken of the light reflecting from the card, the result will be an average in the middle between the intensity of reflected light that would be reflected by pure black and pure white if it were in the scene. Most "gray cards" made for photography light readings are 18% gray on one side and pure white on the other. The white side can be used for a reading as well, but will represent (usually) the brightest possible reflected light versus a dead center average from the gray. Another use for both the gray and white sides of the card is to take photographs with the card in the scene and photographs without it. The negatives with the card can then be used for determining the brightness and color balance for prints without the card present.
The reason for discussing incident light is this is another method for measuring light with more sophisticated (hand held) light meters. There is generally an attachment, usually a white translucent cover (to diffuse the light), for making an incident light measurement. To make an incident reading, one must go to the scene of interest and measure in the direction of the light source. This can be a problem if the scene is a landscape of Arizona's Grand Canyon. However a reasonable incident reading outdoors can be made if a position can be found illuminated at the same intensity and manner by the same source(s) and measures in the direction of the source. This is most easily done outdoors in daylight. Incident readings are most difficult with multiple light sources, or if the light source is relatively close to the subject and getting to a position at the subject is not possible.