Exposure
 |
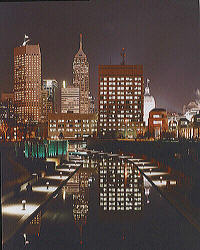 |
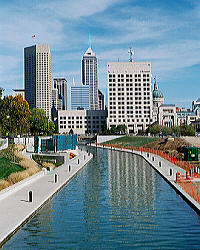
The two photographs above were taken at the same location The left one was made during mid-afternoon in bright sunlight and clear sky (after waiting for the clouds to clear the sun). The right one was made late at night with the only light coming from man-made lighting in the city. Both are well exposed. Not only is the brightness of the lighting completely different, they were made with two different cameras, and two different films with different film speeds. No, the right one did not use a super-speed film. It was still relatively slow, only slightly faster than the film used for the left one (which gave me the idea to go back at night). Obviously these two photographs required completely different exposure settings on the cameras used for them.
Exposure determines how much light gets to the film. All still cameras have two fundamental controls for this: lens aperture and shutter speed. The combination of the two is the exposure value, or EV used for exposure. Film speed (discussed later) determines the quantity of light that will properly expose the film. The combination of film speed and the brightness of the scene determine an EV that can be translated into specific combinations of aperture and shutter speed to capture the proper quantity of light.
Certain accessories and specialized photography can require compensation or correction to the exposure that would otherwise be used. These include filters and devices such as extension tubes used for macrophotography. Even if the camera body has an AE (automatic exposure) system that measures exposure TTL (through the taking lens) and will automatically correct the exposure, understanding the compensation or correction that it will apply can assist with providing sufficient light and/or film speed selection.
Exposure Value
The full name for Exposure Value, or EV, is the Additive Photographic Exposure System. Exposure Value has two equivalent definitions. The first defines how much light will be admitted to the film by the combination of lens aperture and shutter speed. The second defines how much exposure is required by the combination of subject luminance (e.g., how bright it is) and film speed. Setting a combination of aperture and shutter speed on a camera with an EV that equals the EV for the subject luminance and film speed should result in a properly exposed photograph.What constitutes a proper exposure to achieve the photographer's "vision" for the final image is subjective. The EV normally represents a proper exposure for the overall subject luminance to average 18% gray in the film image. This is acceptable for most conditions, but under unusual lighting circumstances or if a creative "vision" for the image calls for an unusual exposure, the EV must be adjusted for the desired film exposure. In effect, under unusual conditions or for an unusual exposure technique, what is to be rendered the equivalent of 18% gray on the film image is shifted to something higher or lower in luminance than the overall subject average. It is presumed in the rest of this discussion that either the overall subject luminance average is desired, or that any desired shift from the overall average has already been determined and the adjustment made during metering of the subject's luminance. One method for adjusting exposure is taking spot meter readings from a portion of the subject and another is adjusting the film speed on the meter. Some cameras have an EV control for doing the same thing.
Mathematically, the two definitions for EV are calculated as follows:
- For how much light will be admitted to the film by aperture and shutter speed:
- For how much exposure is required by subject luminance and film speed:
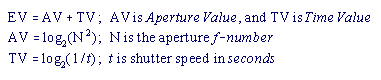
AV = 0 for an aperture of f /1, and TV = 0 for a shutter speed of 1 second.

SV = 0 for an ISO film speed of 3.125, and BV = 0 at 1 foot-Lambert of luminance.
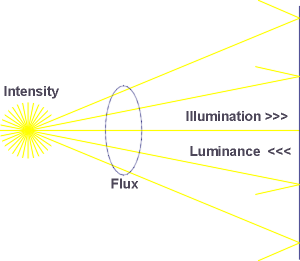
What is a foot-Lambert (fL)? Most find differences among units used for measuring light rather subtle. First, the fundamental unit is the candela (cd), a measure of light intensity. It was formerly called the "candle" and "international candle." The candela is a measure of how much light a point source radiates. If that light is transmitted to a surface somewhere, the transmission, or flux is measured in lumens which represents how much light is being transmitted over a spherical solid angle (called a steradian) with the center at the light source. A steradian is a unit area of a spherical surface with a unit radius. Thus there are four pi steradians to a complete sphere. [This is the solid equivalent of a circle in a plane and measuring plane angles in radians with two pi radians to a full circle.] A one square foot surface on a sphere with a one foot radius with a one candela source at the center of the sphere receives one foot-candle of illumination. The light reflected by (or emitted by) a surface is its luminance. A perfectly reflective surface receiving one foot-candle of illumination has a luminance of one foot-Lambert.
[whew!]
Some might be familiar with the metric (SI) units for these measures: intensity = candelas, flux = lumens, illumination = lux (or meter-candle), and luminance = candelas per square meter.
If luminence is measured in the same manner as SI using English units, it is expressed as candelas per square foot (cd/ft2). Some light meters have a scale marked in cd/ft2. One cd/ft2 is pi foot-Lamberts. In other words, multiply luminance measured in cd/ft2 by pi (~ 3.14159) to convert it to foot-Lamberts. If the meter is marked in proper SI units it will show candelas per meter squared (cd/m2). Multiply cd/m2 by 0.2918635 to convert it to foot-Lamberts. These are the proper units of measure for "areal intensity of an extended source" (intensity of light from an area, not a point).
Unfortunately, units such as foot-candles and lux are improperly used
on reflected light meter scales. They are illumination, not luminance,
and this is a source of confusion for photographers. The values shown
in their scales is the required illumination for a perfectly reflective
surface to produce the luminance measured by the meter. This is not
the true illumination because no surface is perfectly reflective.
The true illumination will be something higher. How much higher depends
on how reflective the surface is. However, presumption of a perfectly
reflective surface for the scale markings does enable a conversion to luminance
in foot-Lamberts. The following table gives some conversion factors
if a meter is marked in something other than foot-Lamberts:
| To convert from this
to foot-Lamberts |
Muliply by this |
| cd/ft2 | 3.14159 (pi) |
| cd/m2 | 0.2918635 |
| * foot-candles | 1 |
| * lux | 0.0929 |
but are sometimes improperly used to represent
luminance. See the text above for explanation.
To give some sense of scale to these units, an 18% gray card outdoors in direct sunlight under clear sky (visually looks middle gray, or half-way between white and black) has a luminance of approximately 255-260 cd/ft2. Multiply by pi to convert units and it's approximately 800-815 foot-Lamberts.
The term "stops" is used throughout discussions about exposure. In calculating camera exposure settings, a change of one EV in the settings equals a one stop change in exposure and this is done by changing the shutter speed or the aperture by one stop. In calculating the required exposure, a change of one EV in subject luminance (brightness) or film speed requires a one stop change in exposure.
Required Exposure
The required exposure is a combination of the film speed being used and subject luminance (brightness). Some light meters show the EV. If the dial is rotated to adjust the match-needle pointer for different light levels, the EV number changes. If the ring for setting the film speed is reset to a different film speed, the EV number also changes, even if the match-needle pointer is left indicating the same light level. A photometric light meter finds the EV required for a proper exposure by adding the SV and BV, even if it does not have a luminance (foot-Lambert, cd/ft2 or cd/m2), or EV scale.Film Speed
Film speed defines how quickly an image will be recorded on the film. This is the Film Speed Value (SV) used in determining the total EV required for a proper exposure. The primary system today is the ISO rating. ISO stands for "International Standards Organization." This film speed rating system is derived from the former ASA system (American Standards Association). The exact method by which film is tested to determine its speed changed slightly between ASA and ISO, but for all practical purposes in using the values, they are the same. A third system, for which markings are still found on many cameras is the DIN (Deutsche Industrie Norm) rating. A very old system no longer used is the Weston. It has the same scale as the ASA, but shifted down by 1/3 EV (more on this later).Commonly found ISO ratings for films include 50, 64, 100, 125, 160, 200, 320, 400, and 800. There are a few films as slow as ISO 25 and a couple rated at ISO 1600. Why these numbers? Finding the SV for a few of them will reveal the reasons:
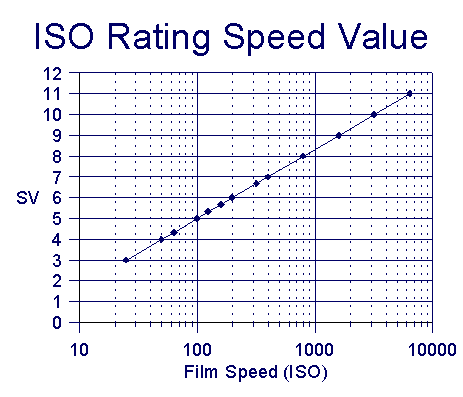
The most commonly found ISO ratings for transparency (slide), black and white negative, and color negative are 64, 100, 125, 160, 200 and 400:For Europeans still using the DIN numbers, finding an SV from a film is simple. Divide the DIN by three, and subtract two [SV = (DIN / 3) - 2]. The old Weston system (no longer used) is 1/3 stop less than the ISO. In other words, an ISO 100 film would be rated 80 in the Weston system, and an ISO 125 film would be rated 100 in Weston. The following graph shows the relationship between ISO film speed on a logarithmic scale and the calculated SV component of EV on a linear scale.
For ISO 64:
SV = log2(0.32 * 64)
SV = log(~20) / log(2)
SV = 4.33For ISO 100:
SV = log2(0.32 * 100)
SV = log(32) / log(2)
SV = 5For ISO 125:
SV = log2(0.32 * 125)
SV = log(40) / log(2)
SV = ~5.33For ISO 160:
SV = log2(0.32 * 160)
SV = log(51.2) / log(2)
SV = ~5.67For ISO 200:
SV = log2(0.32 * 200)
SV = log(64) / log(2)
SV = 6For ISO 400:
SV = log2(0.32 * 400)
SV = log(128) / log(2)
SV = 7Doubling the film speed increases the SV by one. Cutting it in half decreases the SV by one. The numbering also seems to match increments of 1/3 EV. Film makers produce films with speeds in multiples of 1/3 EV. The complete sequence by 1/3 EV increments is 3, 4, 5, 6, 8, 10, 12, 16, 20, 25, 32, 40, 50, 64, 80, 100, 125, 160, 200, 250, 320, 400, etc.
Subject Luminance
This is the Brightness Value (BV) used in determining total EV required for a proper exposure. Subject luminance is the intensity of light being reflected by the subject toward the camera. In some cases it may be emitted by the subject (if said subject is back lit or contains its own source of light). Even so, since a photograph records an area of space on an area of film, it is still an areal intensity, not a point source. Therefore, the proper units by which it should be measured are those for luminance.The following table shows the complete luminance scale in cd/ft2
found on a Weston Ranger 9 light meter, its approximated conversion to
foot-Lamberts (the meter's cd/ft2 scale is an approximation)
and the BV for each. Preceeding the table are computations for the
meter's lowest and highest luminance levels it can read:
fL = pi (cd/ft2); BV is calculated using foot-Lamberts
BV = log2(B)
BV = log(0.006) / log(2) at the lowest luminance level the meter
can read
BV = -7.33 at the lowest luminance the meter can read
BV = log(6400) / log(2) at the highest luminance the meter can read
BV = 12.67 at the highest luminance the meter can read
| cd/ft2 | .002 | .004 | .008 | .016 | .032 | .064 | .125 | .25 | .5 | 1 | 2 | 4 | 8 | 16 | 23 | 64 | 125 | 250 | 500 | 1000 | 2000 |
| fL | .006 | .012 | .025 | .05 | .1 | .2 | .4 | .8 | 1.6 | 3 | 6 | 12 | 25 | 50 | 100 | 200 | 400 | 800 | 1600 | 3200 | 6400 |
| BV | -7.3 | -6.3 | -5.3 | -4.3 | -3.3 | -2.3 | -1.3 | -0.3 | 0.7 | 1.7 | 2.7 | 3.7 | 4.7 | 5.7 | 6.7 | 7.7 | 8.7 | 9.7 | 10.7 | 11.7 | 12.7 |
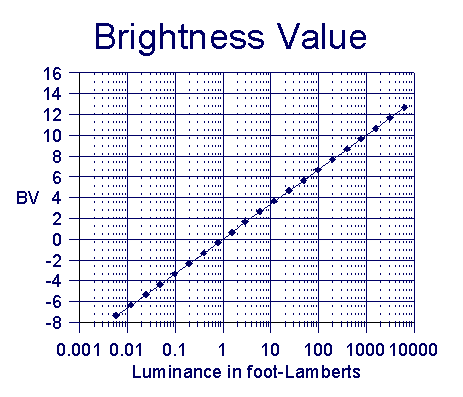
The BV caculated from the meter's scale ranges from (approximately) -7.33 to 12.67 in one EV increments and represents the meters range of 21 stops. The markings on the meter's scale are therefore in one stop increments. The following graph shows the relationship between luminance in foot-Lamberts on a logarithmic scale and the calculated BV component of EV on a linear scale.
Exposure Settings
Once the EV is determined for the combination of film speed being used and the subject luminance, the possible combinations of shutter speed and aperture can be determined for all the exposure setting options. Why would options in the exposure setting be desirable? Two issues: depth of field control (narrow or large), and the possible need to stop action or avoid camera shake (general limit for a hand held SLR is a slowest shutter speed of 1/(focal length).Shutter Speed
Shutter speed controls how long the film is exposed to light. This is the Time Value (TV) portion of the camera's EV setting. Common markings on shutter speed dials found on cameras made since about 1960-1970 are 1, 1/2, 1/4, 1/8, 1/16, 1/32, 1/60, 1/125, 1/250, 1/500, and 1/1000. Some go as high as 1/2000 and 1/4000. These are times in seconds. Many times the markings are just the denominator (60, 125, 250, etc.). How do these change a camera's EV for its exposure setting in terms of the TV?Going from lowest to highest shutter speed, each successive setting
is approximately twice the previous shutter speed. This means each
successive setting increase cuts the amount of light reaching the film
in half. The following table shows the complete shutter speed scale
in seconds found on a Mamiya M645 with PdS Finder. Preceeding the
table are computations for the camera body's slowest and fastest shutter
speeds of 8 seconds and 1/500th second:
TV = log2(1/t)
TV = log(1 / 8) / log(2) at the slowest shutter speed setting
TV = -3 at the slowest shutter speed setting
TV = log(1 / 1/500) / log(2) at the highest shutter speed setting
TV = 9 at the highest shutter speed setting
| Shutter | 8 | 4 | 2 | 1 | 1/2 | 1/4 | 1/8 | 1/16 | 1/30 | 1/60 | 1/125 | 1/250 | 1/500 |
| TV | -3 | -2 | -1 | 0 | 1 | 2 | 3 | 4 | 5 | 6 | 7 | 8 | 9 |
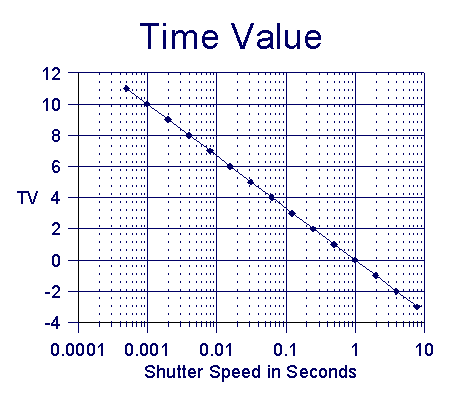
The following graph shows the relationship between shutter speed on a logarithmic scale and TV on a linear scale:
Lens Aperture
Lens aperture controls how much light passes through a lens. This is the Aperture Value (AV) portion of the camera's EV setting. This is done by adjusting the diameter of the diaphragm or iris in the lens. During the 19th Century a numbering scheme called an "f-stop" was devised so aperture numbers would equate to the same amount of light passing through regardless of lens focal length. The f-stop number is the lens focal length divided by the diameter of the aperture opening. [See the "Lens" section for more about this.]With early, much simpler 19th Century lenses this was relatively easy to measure. Today, lens aperture rings are marked with f-stop numbers and are commonly written in text as f/#.# where "#.#" is the f-stop value. The "f" refers to the focal length of the lens. If lens focal length divided by aperture diameter gives the f-stop number, then the focal length divided by the f-stop number gives the aperture diameter.
Common f-stop number markings found on lens aperture rings are 1.4, 2, 2.8, 4, 5.6, 8, 11, and 16. Some lenses will show a lowest value between these, such as 1.2, 1.8, 3.5, 4.5, 6.3 etc. Some other lenses will also show higher f-stop numbers at the other end, such as 22 and 32.
Why are lenses marked this way? The f-stop number is inversely proportional to the aperture diameter (focal length divided by aperture diameter). However, the amount of light entering the lens and going past the aperture diaphragm to the film (when the shutter is open) is proportional to the area of the opening. Going from the widest to the narrowest apertures with the most commonly found f-stop number markings, if we square them, we now have numbers inversely proportional to the aperture area, and therefore the amount of light passing through the lens. The following table shows common f-stop numbers, the approximate square of them and the approximated AV for them using AV = log2(N2), where N is the f-stop number:
| f-stop number | 1 | 1.4 | 2 | 2.8 | 4 | 5.6 | 8 | 11 | 16 | 22 | 32 | 45 | 64 |
| (f-stop number)2 | 1 | 2 | 4 | 8 | 16 | 32 | 64 | 128 | 256 | 512 | 1024 | 2048 | 4096 |
| AV | 0 | 1 | 2 | 3 | 4 | 5 | 6 | 7 | 8 | 9 | 10 | 11 | 12 |
What about the other intermediate f-stop numbers commonly found as the widest aperture of a lens (the lens speed)? The next table shows the approximated AV for them:
| f-stop number | 1.2 | 1.8 | 3.5 | 4.5 | 6.3 | 9 |
| AV | 0.5 | 1.67 | 3.67 | 4.33 | 5.33 | 6.33 |
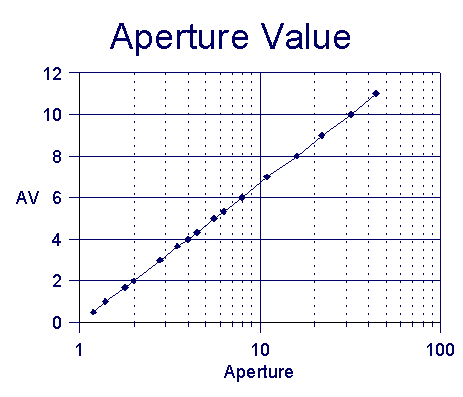
The following graph shows the relationship between aperture f-stop numbers on a logarithmic scale and AV on a linear scale:
Exposure Example
Imagine the light meter dials showing shutter speed and aperture combinations have suddenly gone blank leaving only the scale showing luminance. The following walk through using the EV system for finding the EV required for a proper exposure, then the combinations of aperture and shutter speed that can be used to attain the proper exposure.The Left Photograph:
Going back to the two photographs in this section, the one on the left was a bright sunny day under clear sky (no cloud shadows). There is nothing unusual about this scene that requires an exposure adjustment from an average reflected light meter reading. In other words, the average scene is the equivalent of an 18% gray card and an average reading of the overall scene will provide the desired exposure.- Film speed: ISO (ASA) 100
- Reflected light meter reading (average, not spot metered): 250 cd/ft2
SV = log2(0.32 * 100)For a proper exposure, the required EV for the camera's shutter speed and aperture settings (AV + TV) must add to something very close to 14.67. The lens used has an aperture range of f/1.8 to f/16 with the first two detents at f/1.8 and f/2.8. The camera body has a shutter speed range of 1 second to 1/1000th second.
SV = log(32) / log(2)
SV = 5BV = log2(pi * 250)
BV = log(800) / log(2)
BV = 9.67EV = SV + BV
EV = 5 + 9.67
EV = 14.67
AVmin = log2(1.82)For the highest AV of 8, the smallest TV is 7. For the highest TV of 10, the smallest AV is 5. Thus, all the possible combinations of aperture and shutter speed will lie between an AV of 5 to 8, and a TV of 7 to 10. The following table summarizes all the possible combinations of aperture and shutter speed within these ranges and the EV for them:
AVmin = log(3.24) / log(2)
AVmin = 1.67
AVmax = log2(162)
AVmax = log(256) / log(2)
AVmax = 8
The available (detented) AV settings are 1.67, 3, 4, 5, 6, 7 and 8TVmin = log2(1 / 1)
TVmin = log(1) / log(2)
TVmin = 0
TVmax = log2(1 / 1/1000)
TVmax = log(1000) / log(2)
TVmax = 10
The available TV settings are 0, 1, 2, 3, 4, 5, 6, 7, 8, 9 and 10
| f-stop | f/5.6 | f/8 | f/11 | f/16 | |
| shutter | TV\AV | 5 | 6 | 7 | 8 |
| 1/125 | 7 | 12 | 13 | 14 | 15 |
| 1/250 | 8 | 13 | 14 | 15 | 16 |
| 1/500 | 9 | 14 | 15 | 16 | 17 |
| 1/1000 | 10 | 15 | 16 | 17 | 18 |
| 1/125 | sec | @ | f/16 |
| 1/250 | sec | @ | f/11 |
| 1/500 | sec | @ | f/8 |
| 1/1000 | sec | @ | f/5.6 |
The Right Photograph:
The photograph on the right was in the middle of the night with the only light coming from the citiy lights. Even so, in a major urban area, there is nothing unusual about this scene requiring an exposure adjustment from an average reflected light meter reading. In other words, the average scene is the equivalent of an 18% gray card and an average reading of the overall scene will provide the desired exposure.- Film speed: ISO (ASA) 160
- Reflected light meter reading (average, not spot metered): 0.25 cd/ft2
SV = log2(0.32 * 160)For a proper exposure, the required EV for the camera's shutter speed and aperture settings (AV + TV) must add to something very close to 5.33. The lens used has an aperture range of f/2.8 to f/22. The camera body has a shutter speed range of 8 seconds to 1/500th second.
SV = log(51) / log(2)
SV = 5.67BV = log2(pi * 0.25)
BV = log(0.8) / log(2)
BV = -0.33EV = SV + BV
EV = 5.67 - 0.33
EV = 5.33
AVmin = log2(2.82)For the highest AV of 9, none of the values for TV are small enough for an EV of 5. For the smallest TV of -3 an AV of 8 will sum to an EV of 5. For the smallest AV of 3, a TV of 2 will sum to an EV of 5. Thus, all the possible combinations of aperture and shutter speed will lie between an AV of 3 to 8, and a TV of -3 to 2. The following table summarizes all the possible combinations of aperture and shutter speed within these ranges and the EV for them:
AVmin = log(8) / log(2)
AVmin = 3
AVmax = log2(222)
AVmax = log(256) / log(2)
AVmax = 9
The available (detented) AV settings are 3, 4, 5, 6, 7, 8 and 9TVmin = log2(1 / 8)
TVmin = log(0.125) / log(2)
TVmin = -3
TVmax = log2(1 / 1/500)
TVmax = log(500) / log(2)
TVmax = 9
The available TV settings are -3, -2, -1, 0, 1, 2, 3, 4, 5, 6, 7, 8, and 9
| f-stop | 2.8 | 4 | 5.6 | 8 | 11 | 16 | |
| shutter | TV\AV | 3 | 4 | 5 | 6 | 7 | 8 |
| 8 | -3 | 0 | 1 | 2 | 3 | 4 | 5 |
| 4 | -2 | 1 | 2 | 3 | 4 | 5 | 6 |
| 2 | -1 | 2 | 3 | 4 | 5 | 6 | 7 |
| 1 | 0 | 3 | 4 | 5 | 6 | 7 | 8 |
| 1/2 | 1 | 4 | 5 | 6 | 7 | 8 | 9 |
| 1/4 | 2 | 5 | 6 | 7 | 8 | 9 | 10 |
| 8 | sec | @ | f/16 |
| 4 | sec | @ | f/11 |
| 2 | sec | @ | f/8 |
| 1 | sec | @ | f/5.6 |
| 1/2 | sec | @ | f/4 |
| 1/4 | sec | @ | f/2.8 |
Isn't it wonderful the dials on a light meter do all this work for us?
Correction Factors and Compensation
First some definitions as used in this section:- Correction Factor: a number that when multiplied by the shutter speed gives the correct exposure. It is an adjustment to the amount of time used for an exposure. It is not EV (exposure value) or exposure stops and cannot be used as a factor with the EV. Neither can it be used as a factor for the aperture f-number. A correction factor can only be used with the shutter speed. Converting a correction factor to a factor that can be used with the aperture f-number, or to the number of shutter or aperture stops is shown at the appropriate place in each sub-section.
- Compensation: a number in EV (exposure stops) for adjusting either the aperture or shutter speed. This value is not a factor to multiply either the shutter speed or aperture f-number with. Converting from an EV compensation to a factor for the shutter speed or aperture f-number is simply the opposite of converting from a correction factor to compensation in EV.
If using an SLR with TTL or TTL/OTF metering, the internal meter reads through the lens and will automatically adjust exposure for you. This works very well with extension tubes, bellows and most filters. One exception is a flash not controlled by the TTL or TTL/OTF metering. A second exception is deeply colored filters with TTL or TTL/OTF metering. This includes control of flash intensity using TTL or TTL/OTF metering. Some TTL or TTL/OTF sensors can be thrown off by some filters if meter sensitivity across the visible spectrum doesn't match that of the film being used (most meter sensors do not). Most filters are not a problem; it is an issue primarily with color filters severe enough to approach "color separation" type filtering (e.g. blocking out all red, or blue, or cyan, etc.). Examples of them are some specialized Black-and-White filters such as a No. 25 Red, No. 58 Green, and No. 47 Blue. In these cases, a series of experiments with the specific camera body, film and flash unit using a neutral 18% gray subject can help establish a proper correction factor.
Filters
UV, Haze, UV Haze, UV 0, UV 010, and other Haze or UV filters do not require any exposure correction. In practice, a Skylight 1A or 1B does not either even though they are often marked with a 1.1 correction factor. The most common situation requiring use of a correction factor is with either a polarizer or for commonly used Black-and-White filters.Some general guidelines are in the four tables that follow. Filters are often marked on their ring with an exposure correction factor, or on a data sheet provided by the manufacturer with the filter. If it is marked or there is a data sheet, use that as a starting point. Filter manufacturer recommendations are more accurate than the general guidelines given in these tables below. Exact correction can vary with the specific film being used due to differences in spectral sensitivities between films, and light transmission through the same filter number can vary among filter manufacturers.
The first contains common filters used with panchromatic black-and-white films. The first two rows contain commonly used letters and Kodak's Wratten numbers for the filters. Some manufacturers use one system, and some use the other. The translation to Wratten numbers is closely approximate, but not exacting. The Daylight Factor is for daylight, or a standard flash for which color correction is not required with daylight color film. The Tungsten factor is for Black-and-White film being used under tungsten lighting. Normally no color correction is required for Black-and-White film under tungsten lighting, but it does change the correction factors for common Black-and-White filters.
| Letter | K1 | K2 | X1 | X2 | G | A | (green) | (blue) | |||||||
| Wratten # | 3* | 5** | 6 | 8 | 9* | 11 | 12** | 13 | 15 | 16* | 22* | 25 | 29** | 58 | 47 |
| Daylight Factor | 1.5 | 1.5-2 | 1.5 | 2 | 3 | 4 | 3-4 | 5 | 2.5 | 4 | 4 | 8 | 8 | 6 | 8 |
| Tungsten Factor | 1.5 | 1.5 | 4 | 5 | 1.5 | 5 | 8 | 12 |
The next three tables show common filters used with color films, either negative or transparency (slide) with Kodak's generic, B+W (Schneider Optics), and Heliopan's recommended correction factors.
| Filter Letter | 81A | 81B | KR3 | KR6 | KR9 | KR12 | KR15 | |||
| Wratten # | 81 | 81A | 81B | 81C | 81D | 81EF | 85 | 85B | 85D | |
| Kodak | 1.3 | 1.3 | 1.3 | 1.3 | 1.6 | 1.6 | 1.6 | 1.6 | 1.3 | |
| B+W | 1.2 | 1.2 | 1.2 | 1.4 | 2 | 2.3 | ||||
| Heliopan | 1.2 | 1.2 | 1.3 | 1.5 | 1.8 | 2 | 2.3 |
Cooling
| Filter Letter | KB1.5 | KB3 | KB20 | KB15 | KB12 | KB9 | KB6 | ||
| Wratten # | 82 | 82A | 82B | 82C | 80A | 80B | 80C | 80D | |
| Kodak | 1.3 | 1.3 | 1.6 | 1.6 | 4 | 3.2 | 2 | 1.3 | |
| B+W | 1.1 | 1.2 | 2.7 | 2.2 | 2 | 1.5 | |||
| Heliopan | 1 | 1.5 | 5 | 4 | 3 | 2.5 | 2 |
UV, Polarizer and Fluorescent
| Filter Letter | UV(0) | PL | KR1.5 | FL-D | FL-W | |
| Wratten # | 1 | (Polarizer) | 1A | 1B | FL-D | FL-W |
| Kodak | 1 | 2.5 | 1 | 1 | ||
| B+W | 1 | 2.5 | 1.1 | 2 | ||
| Heliopan | 1 | 1 | 2 | 4 |
Correction factors can be used directly to adjust the shutter speed. To adjust aperture with them, which is often more convenient, is not as straightforward. One can also convert them to correction in "stops" (or EV) but it is not straightforward either.
Adjusting Shutter Speed
To adjust exposure with the shutter speed, simply multiply the shutter speed in seconds by the correction factor. This works well when the correction factor is a power of two (20 = 1, 21 = 2, 22 = 4, 23 = 8, etc.). For example, starting with a shutter speed of 1/500th second, a correction factor of 2 would give a shutter speed of 1/250th, 4 gives 1/125th, and 8 gives 1/60th. Correction factors other than these cause difficulties as shutter speeds are nearly always found on camera bodies in whole stops (EV). However, adjusting shutter speed using the correction factor is often easiest with timed exposures.Adjusting Aperture
With shorter shutter speeds it is often easier to adjust the aperture as many of the correction factors are not a power of two. This is not the straightforward multiplication used in adjusting shutter speed, but most aperture rings allow setting them at intermediate positions even if it is detented (has click stops). There are two methods for calculating it:Which one is a matter of convenience. The following are a couple of examples of how to adjust an aperture setting using a correction factor:
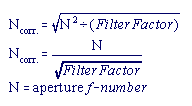
Example 1:
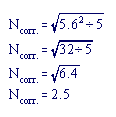
An X2 (Wratten 13) has a filter factor of 5 recommended by Kodak for Black and White film under both daylight and tungsten lighting. The light meter and selected shutter speed recommend f/5.6 for the aperture:This is about 1/3 stop slower (wider) than an f/2.8 aperture, a correction of 2-1/3 EV.
Example 2:
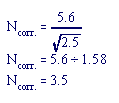
A polarizer with a recommended filter factor of 2.5 is being used to reduce some glare from a few windows on a building. A hand-held light meter and selected shutter speed recommend f/5.6 for the aperture:This is about 1/3 stop slower (wider) than an f/4 aperture, a correction of 1-1/3 EV.
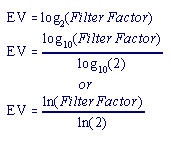
Using EV Correction
Sometimes it is easier to think in terms of how many "stops" or EV are required for exposure correction. This can be translated into a combination of shutter speed and aperture stops, including fractional stops with the aperture. To convert a correction factor into stops or EV:The first is the direct expression and is a base two logarithm. Few calculators can directly calculate a base two logarithm. However, nearly all have a "log" function (base ten) and many have a "ln" (base e, Naperian, or natural log) function. The second two equations make use of the fact that any base logarithm can be used to find any other base logarithm of a number. Either will work and the second two equations show how to use either of them.
Example 1:
An X2 (Wratten 13) has a filter factor of 5 recommended by Kodak for Black and White film under both daylight and tungsten lighting. The hand held light meter and selected shutter speed recommend f/5.6 for the aperture:Applying an EV correction of about 2-1/3 to the aperture gives 1/3 stop slower than f/2.8 or about f/2.5. Compare these results with the example used to calculate the new aperture directly.
Example 2:
A polarizer with a recommended filter factor of 2.5 is being used to reduce some glare from a few windows on a building. A hand-held light meter and selected shutter speed recommend f/5.6 for the aperture:Applying an EV correction of about 1-1/3 to the aperture gives 1/3 stop slower than f/4 or about f/3.5. Compare these results with the example used to calculate the new aperture directly.
Table of EV and Filter Factors:
A table showing filter factors for EV in increments of 1/3 and 1/2 can be very convenient. A home made laminated card of these can be carried in a camera bag easier and used faster than a calculator:| EV | 1/3 | 1/2 | 2/3 | 1 | 1-1/3 | 1-1/2 | 1-2/3 | 2 | 2-1/3 | 2-1/2 | 2-2/3 | 3 | 3-1/3 | 3-1/2 | 3-2/3 | 4 |
| Filter Factor | 1.3 | 1.4 | 1.6 | 2.0 | 2.5 | 2.8 | 3.2 | 4.0 | 5.0 | 5.6 | 6.3 | 8.0 | 10.0 | 11.3 | 12.7 | 16.0 |
Macrophotography
In practice, macrophotography is more or less defined as making photographs in which the subject on film is at least 1/4 life-size. For 35mm this means a standard 4x6 print can will be approximately life-size or larger. If the lens is located such that its rear lens node is located on the film plane, it is focused at infinity. To focus a lens as some distance less than infinity, the rear lens node must be moved forward to some point in front of the film plane. Normal prime lens focusing is usually accomplished with a "helical" that gradually moves the entire lens forward by turning the focusing wheel or focusing ring. Other lenses, such as zoom lenses, move internal elements to shift the rear lens node forward of the film plane. For a "normal" lens the maximum focus distance is infinity. The minimum focus distance is limited by how far forward of the film plane its rear lens node can be moved by the lens' focusing mechanism (or the camera body's for very old cameras and lenses). The minimum focus distance for nearly all but specialized macro lenses is typcially between 1.5 and 3 feet. For telephoto lenses, especially long ones, it can be much farther than 3 feet.There are three general methods for macrophotography, photographs made very close to the subject with high magnification levels:
- Auxiliary Lens (also called a Close-Up Lens or less accurately a Close-up "Filter")
- Extension Tube or Bellows
- Macro Lens
Auxiliary Lens
A "dioptric" auxiliary lens is much like using reading glasses on a normal focusing lens. They are rated in diopters and screw onto the front of a lens just as a filter does. This is why they are sometimes called a filter, which is technically incorrect. Typically they come in a set of +1, +2 and +4 diopters. They can be "stacked" in combinations to move in closer and obtain as much as +7 diopters, in one diopter increments. Just as reading glasses move focusing distance closer to the eye, a close-up auxiliary lens shifts the entire normal focusing range closer to a range of some distance less than infinity to a distance much closer than the lens can normally focus.Close-up lenses are the most inexpensive method for making macros. However, close-up lenses add additional glass elements to a normal lens. The better ones will have two elements; most often they have only one uncoated element. This leads to loss of contrast, aberrations, and risk of both on-axis and off-axis flare. With rare exception, their optics are are not very good compared to the lenses they are used on resulting in image degradation. An auxiliary close-up lens does not require any exposure compensation.
Extension Tube or Bellows
An extension tube or bellows is used between a camera body and the lens. This allows the rear lens node to be moved forward farther than the normal focusing mechanism allows. The result is a range of focus less than infinity and much closer than normal focusing. As the rear lens node is moved forward there is a loss of light. With a normal lens the focusing helical does not move it forward enough for this to make much difference, usually no more than about 1/10th of a stop. The "break point" at which light falloff from close focusing becomes large enough to consider is approximately a lens-to-subject distance less than eight times the focal length.With an extension tube or bellows allowing very close focusing under eight times the focal length, the shorter the distance, the greater the importance of considering the exposure compensation (or correction) required for setting a proper exposure. If a camera with "taking lens" TTL metering is being used (TTL = Through The Lens), it will automatically compensate for the loss of light. Thus, correction factors are not reqired for setting exposure using TTL metering. However, calculating how many stops are lost can help with determining how much light will be required for the macrophotograph, and/or may influence specific film and film speed selection.
If extension distance is known:
The minimum correction factor required can be calculated for the lens'
focus setting in the infinity position if the length of the extenstion
tube or bellows is known:
Minimum Extension Factor = [ (f + x) / f ] 2 , whereThe "Extension Factor" is similar to filter correction factors. It is only a factor for multiplying by the shutter speed. To adjust an aperture setting, divide the aperture f-number by the square root of Extension Factor for the new aperture f-number. To find the compensation in EV (stops), use the following (by applying the same conversion method for filter factors to the above equation):
f = focal length, and
x = extension (or bellows) length.
Minimum Extension Compensation = 2 log10[ (f + x) / f ] / log10( 2 ) , whereThe maximum correction factor required can be found by replacing the lens extension length with the distance the lens is extended by its own focus helical at minimum focus distance plus the lens extension length.
f = focal length, and
x = extension (or bellows) length.
Maximum Extension Factor = [(f + x + y) / f] 2If magnification factor is known:
Maximum Extension Compensation = 2 log10[ (f + x + y) / f ] / log10( 2 ) , where
f = focal length,
x = extension (or bellows) length, and
y = lens helical extension from infinity to minimum focus.
Magnification is the ratio of the subject size to the image size on the film (not on a print). Magnification, M = x / f, and if magnification is known, the equations for using it can be derived from the one above:
(f + x) / f = 1 + (x / f)By substitution of ( 1 + M ) for [ (f + x) / f ] we get:
1 + (x / f) = 1 + M
Extension Factor = ( 1 + M )2As before, this is only good for adjusting a shutter speed. For a compensation factor in EV(stops):
Extension Compensation = 2 log10( 1 + M ) / log10( 2 )Note that this method takes into account the lens extension (or bellows) plus any focusing closer than infinity which extends the lens further (focusing closer than infinity increases the magnification).
Examples:
1. A normal 50mm lens will be used to make a macrophotograph. Its focus ring extends the lens 8mm from infinity to its minimum focus. To make this photograph, a 20mm extension tube will be used with this lens.
Minimum Extension Factor = [( 50 + 20 ) / 50 ] 22. A normal 85mm lens will be used to make a macrophotograph. The magnification on film will be ½ life-size.
Minimum Extension Factor = 1.96, a shutter speed factor of about 2Maximum Extension Factor = [( 50 + 20 + 8 ) / 50 ] 2
Maximum Extension Factor = 2.43, a shutter speed factor of about 2.5Minimum Extension Compensation = 2 log10[ ( 50 + 20 ) / 50 ] / log10( 2 )
Minimum Extension Compensation = 0.971, about 1 EV or stopMaximum Extension Compensation = 2 log10[ ( 50 + 20 + 8 ) / 50 ] / log10( 2 )
Maximum Extension Compensation = 1.283, about 1-1/3 EV or stops (to the nearest 1/3 EV)
Extension Factor = ( 1 + ½ )2
Extension Factor = ( 1.5 )2
Extension Factor = 2.25, a shutter speed factor of about 2.Extension Compensation = 2 log10( 1 + ½ ) / log10( 2 )
Extension Compensation = 2 log10( 1.5 ) / log10( 2 )
Extension Compensation = 1.17, about 1-1/3 EV or stop (to nearest 1/3 EV)
(This is about dead center between 1 EV and 1-1/3 EV; you could also use 1 EV)
Macro Lens
A macro lens is a single lens that can move the rear lens node farther forward from the film plane than a normal lens can, and nearly all still focus at infinity. The optics are designed for this very wide focusing range, and very often the lens is slower than its sister non-macro versions as a result. Focusing range and lens speed eventually reach a point of having to trade-off one for the other in the design. When extended forward to focus very close to the subject, a correction factor may need to be used, just as with an extension tube or bellows. This is dependent on the specific lens and whether its design compensates for light loss in extreme close focusing. Again, SLR TTL metering will compensate for this regardless. Correction factors should be used only when metering is other than TTL, and when the lens doesn't compensate for focusing closer than eight times its focal length.Estimating Exposure
Sometimes an exposure must be estimated due to a camera not having a built-in meter, not having a hand-held meter, or a meter malfunction (e.g., dead batteries). Even if an estimate is not required, at least understanding approximately what an exposure should be is a sanity check of your camera (or hand-held) metering technique. All the sophisticated automated exposure electronics now incorporated into camera bodies does not mean the photographer should leave his brain in the camera bag. The following is a method for estimating exposure. With a little practice and experience one can be fairly accurate with it. Indeed, before meters were built into nearly all camera bodies, this is what nearly all photographers used! A hand-held meter was considered by many to be an expensive, cumbersome extravagance; they didn't need it or want to bother with it. Kodak still publishes outdoor daylight exposure guidelines based on this method in its film data sheets.Outdoor Daylight
This is commonly known as the "Sunny f/16 Rule." On a bright sunny day with average subject illumination by direct sun (sun not obscured by clouds, trees, etc.) a proper exposure can be made by setting the aperture to f/16 and the shutter speed to 1 / (film speed). Thus, with ISO 100 film under these conditions, f/16 @ 1/125th will get a proper exposure. Trading stops of aperture for stops in shutter speed gives the following combinations:f/16 @ 1/125thNot every day or situation will be under direct, unobscured sun, or the subject may be very bright water, beach sand, or snow. What then? The Sunny f/16 Rule can be adjusted for these situations:
f/11 @ 1/250th
f/8 @ 1/500th
f/5.6 @ 1/1000th
f/4 @ 1/2000th
f/2.8 @ 1/4000th
f/2 @ 1/8000th
-1 EV: light sand or snowThe following table gives aperture and shutter speeds based on film speed for each of these conditions:
0 EV: bright or strong hazy sun (distinct, sharp shadows)
+1 EV: weak hazy sun (soft shadows; distinct sun outline in clouds)
+2 EV: cloudy bright (no shadows; sun creates bright area in clouds)
+3 EV: heavy overcast, but not "black" (no shadows; sun location cannot be determined)
+3 EV: open shade (in shadow but 60% sky not obscured)
+4 EV: deep shade (in shadow with obscured sky; under forest canopy)
| ISO 25 - 40 | ISO 50 - 80 | ||||||||||||||||
| f/16 | f/11 | f/8 | f/5.6 | f/4 | f/2.8 | f/2 | f/1.4 | f/16 | f/11 | f/8 | f/5.6 | f/4 | f/2.8 | f/2 | f/1.4 | ||
| sand/snow | 1/60 | 1/125 | 1/250 | 1/500 | 1/1000 | 1/2000 | 1/4000 | 1/8000 | 1/125 | 1/250 | 1/500 | 1/1000 | 1/2000 | 1/4000 | 1/8000 | ||
| bright sun | 1/30 | 1/60 | 1/125 | 1/250 | 1/500 | 1/1000 | 1/2000 | 1/4000 | 1/60 | 1/125 | 1/250 | 1/500 | 1/1000 | 1/2000 | 1/4000 | 1/8000 | |
| weak hazy sun | 1/15 | 1/30 | 1/60 | 1/125 | 1/250 | 1/500 | 1/1000 | 1/2000 | 1/30 | 1/60 | 1/125 | 1/250 | 1/500 | 1/1000 | 1/2000 | 1/4000 | |
| cloudy bright | 1/8 | 1/15 | 1/30 | 1/60 | 1/125 | 1/250 | 1/500 | 1/1000 | 1/15 | 1/30 | 1/60 | 1/125 | 1/250 | 1/500 | 1/1000 | 1/2000 | |
| heavy overcast | 1/4 | 1/8 | 1/15 | 1/30 | 1/60 | 1/125 | 1/250 | 1/500 | 1/8 | 1/15 | 1/30 | 1/60 | 1/125 | 1/250 | 1/500 | 1/1000 | |
| open shade | 1/4 | 1/8 | 1/15 | 1/30 | 1/60 | 1/125 | 1/250 | 1/500 | 1/8 | 1/15 | 1/30 | 1/60 | 1/125 | 1/250 | 1/500 | 1/1000 | |
| deep shade | 1/2 | 1/4 | 1/8 | 1/15 | 1/30 | 1/60 | 1/125 | 1/250 | 1/4 | 1/8 | 1/15 | 1/30 | 1/60 | 1/125 | 1/250 | 1/500 | |
| ISO 100 - 160 | ISO 200 - 320 | ||||||||||||||||
| f/16 | f/11 | f/8 | f/5.6 | f/4 | f/2.8 | f/2 | f/1.4 | f/16 | f/11 | f/8 | f/5.6 | f/4 | f/2.8 | f/2 | f/1.4 | ||
| sand/snow | 1/250 | 1/500 | 1/1000 | 1/2000 | 1/4000 | 1/8000 | 1/500 | 1/1000 | 1/2000 | 1/4000 | 1/8000 | ||||||
| bright sun | 1/125 | 1/250 | 1/500 | 1/1000 | 1/2000 | 1/4000 | 1/8000 | 1/250 | 1/500 | 1/1000 | 1/2000 | 1/4000 | 1/8000 | ||||
| weak hazy sun | 1/60 | 1/125 | 1/250 | 1/500 | 1/1000 | 1/2000 | 1/4000 | 1/8000 | 1/125 | 1/250 | 1/500 | 1/1000 | 1/2000 | 1/4000 | 1/8000 | ||
| cloudy bright | 1/30 | 1/60 | 1/125 | 1/250 | 1/500 | 1/1000 | 1/2000 | 1/4000 | 1/60 | 1/125 | 1/250 | 1/500 | 1/1000 | 1/2000 | 1/4000 | 1/8000 | |
| heavy overcast | 1/15 | 1/30 | 1/60 | 1/125 | 1/250 | 1/500 | 1/1000 | 1/2000 | 1/30 | 1/60 | 1/125 | 1/250 | 1/500 | 1/1000 | 1/2000 | 1/4000 | |
| open shade | 1/15 | 1/30 | 1/60 | 1/125 | 1/250 | 1/500 | 1/1000 | 1/2000 | 1/30 | 1/60 | 1/125 | 1/250 | 1/500 | 1/1000 | 1/2000 | 1/4000 | |
| deep shade | 1/8 | 1/15 | 1/30 | 1/60 | 1/125 | 1/250 | 1/500 | 1/1000 | 1/15 | 1/30 | 1/60 | 1/125 | 1/250 | 1/500 | 1/1000 | 1/2000 | |
| ISO 400 - 640 | ISO 800 - 1280 | ||||||||||||||||
| f/16 | f/11 | f/8 | f/5.6 | f/4 | f/2.8 | f/2 | f/1.4 | f/16 | f/11 | f/8 | f/5.6 | f/4 | f/2.8 | f/2 | f/1.4 | ||
| sand/snow | 1/1000 | 1/2000 | 1/4000 | 1/8000 | 1/2000 | 1/4000 | 1/8000 | ||||||||||
| bright sun | 1/500 | 1/1000 | 1/2000 | 1/4000 | 1/8000 | 1/1000 | 1/2000 | 1/4000 | 1/8000 | ||||||||
| weak hazy sun | 1/250 | 1/500 | 1/1000 | 1/2000 | 1/4000 | 1/8000 | 1/500 | 1/1000 | 1/2000 | 1/4000 | 1/8000 | ||||||
| cloudy bright | 1/125 | 1/250 | 1/500 | 1/1000 | 1/2000 | 1/4000 | 1/8000 | 1/250 | 1/500 | 1/1000 | 1/2000 | 1/4000 | 1/8000 | ||||
| heavy overcast | 1/60 | 1/125 | 1/250 | 1/500 | 1/1000 | 1/2000 | 1/4000 | 1/8000 | 1/125 | 1/250 | 1/500 | 1/1000 | 1/2000 | 1/4000 | 1/8000 | ||
| open shade | 1/60 | 1/125 | 1/250 | 1/500 | 1/1000 | 1/2000 | 1/4000 | 1/8000 | 1/125 | 1/250 | 1/500 | 1/1000 | 1/2000 | 1/4000 | 1/8000 | ||
| deep shade | 1/30 | 1/60 | 1/125 | 1/250 | 1/500 | 1/1000 | 1/2000 | 1/4000 | 1/60 | 1/125 | 1/250 | 1/500 | 1/1000 | 1/2000 | 1/4000 | 1/8000 | |
| ISO 1600 - 2560 | ISO 3200 - 5120 | ||||||||||||||||
| f/16 | f/11 | f/8 | f/5.6 | f/4 | f/2.8 | f/2 | f/1.4 | f/16 | f/11 | f/8 | f/5.6 | f/4 | f/2.8 | f/2 | f/1.4 | ||
| sand/snow | 1/4000 | 1/8000 | 1/8000 | ||||||||||||||
| bright sun | 1/2000 | 1/4000 | 1/8000 | 1/4000 | 1/8000 | ||||||||||||
| weak hazy sun | 1/1000 | 1/2000 | 1/4000 | 1/8000 | 1/2000 | 1/4000 | 1/8000 | ||||||||||
| cloudy bright | 1/500 | 1/1000 | 1/2000 | 1/4000 | 1/8000 | 1/1000 | 1/2000 | 1/4000 | 1/8000 | ||||||||
| heavy overcast | 1/250 | 1/500 | 1/1000 | 1/2000 | 1/4000 | 1/8000 | 1/500 | 1/1000 | 1/2000 | 1/4000 | 1/8000 | ||||||
| open shade | 1/250 | 1/250 | 1/500 | 1/1000 | 1/500 | 1/4000 | 1/8000 | 1/500 | 1/1000 | 1/2000 | 1/4000 | 1/8000 | |||||
| deep shade | 1/125 | 1/125 | 1/250 | 1/500 | 1/1000 | 1/2000 | 1/4000 | 1/8000 | 1/250 | 1/500 | 1/1000 | 1/2000 | 1/4000 | 1/8000 | |||