Types
There are four basic types of camera bodies (for 35mm and medium format):- Viewfinder
- Rangefinder
- Twin Lens Reflex (TLR; nearly all medium format)
- Single Lens Reflex (SLR)
Viewfinder
 This
is the simplest of camera bodies. The eyepiece the photographer looks
through to aim the camera is separate and independent of the lens used
to take the photograph. It is distinguished from the rangefinder
in that there is no manual focusing aid incorporated into the camera body
(but it may still auto-focus). The viewfinder camera body is typically
the least expensive and is used for simpler, less expensive cameras.
This does not mean any lesser photographic quality, but it does mean more
work for the photographer. Amazingly, aspects of the body require
a greater understanding through experience to predict photographic outcome
in spite of all the automated features found on many of them. The
common "point & shoot" (P&S) has a viewfinder body.
This
is the simplest of camera bodies. The eyepiece the photographer looks
through to aim the camera is separate and independent of the lens used
to take the photograph. It is distinguished from the rangefinder
in that there is no manual focusing aid incorporated into the camera body
(but it may still auto-focus). The viewfinder camera body is typically
the least expensive and is used for simpler, less expensive cameras.
This does not mean any lesser photographic quality, but it does mean more
work for the photographer. Amazingly, aspects of the body require
a greater understanding through experience to predict photographic outcome
in spite of all the automated features found on many of them. The
common "point & shoot" (P&S) has a viewfinder body.
Eyepiece
 On
a viewfinder camera body, the eyepiece is a completely separate optical
system from the lens used for taking the photograph. Looking at the
front of the camera there will be a small, usually rectangular, window
directly in front of the eyepiece on the back. The bulk of P&S
cameras are of the viewfinder type. Basic aiming aids in all but
the simplest and oldest viewfinder camera bodies include "bright lines."
These are lines, or sometimes marks, near the corners and edges of the
image seen through the eyepiece. They indicate the outline or "frame"
of the photograph.
On
a viewfinder camera body, the eyepiece is a completely separate optical
system from the lens used for taking the photograph. Looking at the
front of the camera there will be a small, usually rectangular, window
directly in front of the eyepiece on the back. The bulk of P&S
cameras are of the viewfinder type. Basic aiming aids in all but
the simplest and oldest viewfinder camera bodies include "bright lines."
These are lines, or sometimes marks, near the corners and edges of the
image seen through the eyepiece. They indicate the outline or "frame"
of the photograph.
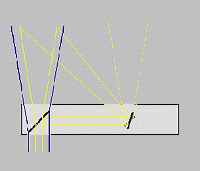
Nearly all that have bright lines also have a secondary set of smaller or narrower marks offset from the basic ones. This brings up a disadvantage of the viewfinder body. Since the eyepiece and its optics are seaprate from the lens that takes the photograph, they are offset from each other on the camera body. This offset causes a "parallax" error meaning what is seen through the eyepiece is not exactly what the film will see through the lens. This isn't a big problem for objects at a distance (beyond about 15-20 feet) but can be a significant one for close objects (especially under 5 feet).
 This
brings up the "downside" of viewfinder cameras (don't worry, there is an
"upside" too). Since the eyepiece and its lens system is offset from
the lens that takes the photograph, the image seen looking through the
eyepiece is not exactly what the "taking" lens will see. It comes
closest when the subject of interest is a great distance from the camera.
The problem is when the subject of interest is only a few feet away and
is called parallax error. This is the purpose of the second set of
lines if frame lines are shown in the eyepiece. They typically show
the outline of the photograph that will be taken when the camera is at
its closest focus. At distances in between closest focus and infinity
the frame should be must be estimated somewhere between the two.
In practice, if the bright lines are reasonably accurate at "infinity"
there is not much to worry about until the distance to the subject is under
about ten feet or about three meters. This is one of the aspects
about viewfinder and rangefinder cameras that requires some special knowledge
about the camera in spite of whatever auto exposure and auto focusing it
may have.
This
brings up the "downside" of viewfinder cameras (don't worry, there is an
"upside" too). Since the eyepiece and its lens system is offset from
the lens that takes the photograph, the image seen looking through the
eyepiece is not exactly what the "taking" lens will see. It comes
closest when the subject of interest is a great distance from the camera.
The problem is when the subject of interest is only a few feet away and
is called parallax error. This is the purpose of the second set of
lines if frame lines are shown in the eyepiece. They typically show
the outline of the photograph that will be taken when the camera is at
its closest focus. At distances in between closest focus and infinity
the frame should be must be estimated somewhere between the two.
In practice, if the bright lines are reasonably accurate at "infinity"
there is not much to worry about until the distance to the subject is under
about ten feet or about three meters. This is one of the aspects
about viewfinder and rangefinder cameras that requires some special knowledge
about the camera in spite of whatever auto exposure and auto focusing it
may have.
Many viewfinder cameras without bright lines will show a bit less in the eyepiece than the photograph will contain. Those with brightlines will often have them slightly tighter also. This is a "safety margin" so that something very close to the edge of the viewfinder will be assured of being in the photograph. This is important to know because if you are trying to exclude something by just barely keeping it out of view in the viewfinder (or just outside the bright lines), there is a chance the photograph may still contain a piece of it. In other words, be prepared to crop the result some. This is not all bad. Given the choice, it is much easier to crop a small amount of photograph out when printing it than it is to try to add something that didn't quite make it completely into the photograph (cropping out huge chunks out causes other problems discussed later).
A way to test how accurate the aiming and the edges or brightlines are is to photograph a brick wall straight on. Mark the bricks with tape (or something else removeable afterwards) to identify them later. The mortar lines can be lined up with at least three of the four edges by moving closer or farther and from side to side. Lining up the fourth edge may not be possible, but notes can be made about how much brick was at the fourth edge. Comparing the resultant complete, uncropped photograph with the notes made will tell you how accurate the viewfinder is. If the printer crops slightly (and many do), use a powerful magnifying glass and look at the negatives instead of the prints. Although inaccuracy typically cannot be fixed, at least the error is now known and can be adjusted for when using the camera. By doing this at known distances (use a tape measure), the amount of parallax error can also be measured and a feel for how much parallax adjustment is required when photographing a close subject can be learned. A small experiment carefully conducted with the cheapest color negative film on the rack can provide some very useful information and prevent disappointment later.
There are a very few camera bodies made that will correct the parallax error as the camera is focused. That is, it adjusts the aim of the viewfinder slightly depending on what distance the focus is set to. This feature is found on only the most expensive and typically newest of rangefinder type bodies, including a couple still made today.
Now for the upside. Since the lens system the photographer uses is separate from the lens system used to take the photograph, the photographer sees the subject before, during and after exposure of the film. This makes panning with a moving subject, capturing a special moment at exactly the precise time, or detecting when someone has blinked, easier than with the SLR.
Focus
A viewfinder camera has no focusing aids. Four methods for focusing are used: fixed, zone, scale and autofocus.Fixed focus bodies have no focusing adjustment. These are among the simplest and least expensive of cameras. An example is the single use "disposable" camera preloaded with film and often sold by the film manufacturers. In reality, they are made to be opened non-destructively and recycled by the film maker. Focusing is permanently set at infinity or a hyperfocal distance less than infinity. These cameras typically have a fixed focal length and aperture also. A combination of modest wide angle lens (35mm is not uncommon) and small aperture allows a very wide acceptable focusing range for the intended market end user.
Zone focusing is commonly found on simple P&S type bodies that have a Program Mode to automatically set a fixed combination of aperture and shutter speed for the required exposure. Because the aperture varies a fixed focus is not viable. Many have three focus settings, usually with a lever or switch near the lens: closeup, medium and distant (or infinity). These positions are often marked with pictographs showing sihlouettes of a portrait, group of people and mountain scene. As with a fixed focus the lens is usually a modest wide angle and the widest aperture is not too large which creates a large depth of field.
Scale focusing allows continuous adjustment from the lens design's closest possible focus to infinity as with any of the other bodies; it is simply missing a focusing aid. Distance must be estimated and transferred using markings on the lens focus ring to focus the camera. This is easier than it sounds with some practice using known distances. With a modest wide angle lens (35mm or 40mm) that is not super fast (no bigger than f/2.8 aperture), and some practice by the user, this method can be quite forgiving of small distance estimating errors and produce very sharp focusing. Prior to focusing aids for rangefinding being built into camera bodies, nearly all of the old (vintage) but more sophisticated camera bodies used scale focusing. Practiced users of scale focus bodies often find that focusing is faster than with a body that has a focusing aid!
Autofocus is typically an electronic infrared ranging system built into the camera body to determine distance, usually at the center of the viewfinder, and set focusing through a motor and gear train. Most current P&S cameras, other than the very least expensive, have some form of autofocus, but rarely have a manual override by which the user can set focusing manually.
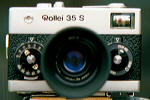
Rangefinder
 The
rangefinder (RF) is a viewfinder with the additional feature of a "rangefinder"
for the photographer to use as a manual focusing aid. These are normally
35mm format and range from relatively simple to very sophisticated.
The name comes from the common focusing aid found on many of them, a rangefinder,
which will be discussed in more detail later. Part of this focusing
aid is a second, typically smaller, window on the front of the camera body;
the eyepiece uses both windows. Not many rangefinder cameras are
made any more. They have been supplanted by the SLR, most especially
in 35mm format. Two that come to mind as currently available on the
market, the Leica and the Contax are among the most expensive 35mm camera
bodies. The SLR overtook the 35mm rangefinder body nearly completely
during the early 1960's (the Nikon F SLR introduced into the market in
1959 was the watershed).
The
rangefinder (RF) is a viewfinder with the additional feature of a "rangefinder"
for the photographer to use as a manual focusing aid. These are normally
35mm format and range from relatively simple to very sophisticated.
The name comes from the common focusing aid found on many of them, a rangefinder,
which will be discussed in more detail later. Part of this focusing
aid is a second, typically smaller, window on the front of the camera body;
the eyepiece uses both windows. Not many rangefinder cameras are
made any more. They have been supplanted by the SLR, most especially
in 35mm format. Two that come to mind as currently available on the
market, the Leica and the Contax are among the most expensive 35mm camera
bodies. The SLR overtook the 35mm rangefinder body nearly completely
during the early 1960's (the Nikon F SLR introduced into the market in
1959 was the watershed).
Eyepiece
 The
eyepiece on a rangefinder body is nearly identical to that found on the
viewfinder body with one important difference. The RF gets its name
from the type of focusing aid provided, typically a yellow rectangle in
the center of the eyepiece. On some very old cameras (such as the
Leica II and III) a separate eyepiece is used for the rangefinder focusing.
The photographer looks through an RF eyepiece to focus and then a different
eyepiece to compose, or vice versa. Most (though not all) made after
W.W.II have the rangefinder focus aid built into the same eyepiece for
composing the photograph. There will be more about the rangefinder
focusing and how it is used in the focusing section.
The
eyepiece on a rangefinder body is nearly identical to that found on the
viewfinder body with one important difference. The RF gets its name
from the type of focusing aid provided, typically a yellow rectangle in
the center of the eyepiece. On some very old cameras (such as the
Leica II and III) a separate eyepiece is used for the rangefinder focusing.
The photographer looks through an RF eyepiece to focus and then a different
eyepiece to compose, or vice versa. Most (though not all) made after
W.W.II have the rangefinder focus aid built into the same eyepiece for
composing the photograph. There will be more about the rangefinder
focusing and how it is used in the focusing section.
Prior to the SLR, there were a number of RF makes and models with interchangeable lenses. The aiming eyepiece in the body typically had the same angle of view as a standard 50mm focal length lens. With interchangeable lenses of different focal lengths, the angle of view is different. On some of the newer ones the eyepiece has a wide angle of view with separate brightlines showing frames for various focal length. On many, however, the photographer had to use a separate accessory eyepiece that had the same angle of view as the wide-angle or telephoto lens on the camera. The separate eyepiece slid into the accessory shoe and was used to aim the camera. Focusing would be performed using the normal eyepiece (or separate rangefinder eyepiece) as with a standard 50mm lens. The RF, like the viewfinder camera, has the disadvantage of parallax error with extremely close subjects and advantage of being able to see the subject during the exposure.
Focus
 The
focusing aid is a rangefinder incorporated into the eyepiece and uses the
principle of triangulation to determine distance between the camera and
the object being brought into focus. It is a center spot, typically
a rectangle covering the middle third and tinted yellow or sometimes green
to provide contrast. An image through another smaller window at the
other end of the body is overlaid on top of the main image in the center
spot using mirrors or prisms. As the lens is focused, the mirror
(or prism) behind the smaller rangefinder window is rotated. When
out of focus a double image of the object will be seen in the center spot.
As the lens is focused properly the double image in the center spot will
converge into a single image.
The
focusing aid is a rangefinder incorporated into the eyepiece and uses the
principle of triangulation to determine distance between the camera and
the object being brought into focus. It is a center spot, typically
a rectangle covering the middle third and tinted yellow or sometimes green
to provide contrast. An image through another smaller window at the
other end of the body is overlaid on top of the main image in the center
spot using mirrors or prisms. As the lens is focused, the mirror
(or prism) behind the smaller rangefinder window is rotated. When
out of focus a double image of the object will be seen in the center spot.
As the lens is focused properly the double image in the center spot will
converge into a single image.
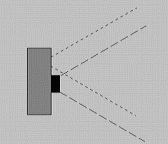
A rangefinder is only as accurate as its "base" which is the distance between the main viewfinder window and the smaller rangefinder window. The longer the base, the greater the sensitivity to the angle of the mirror (prism) behind the rangefinder window. When calibrated properly to the actual lens focus a rangefinder with a reasonable base (at least 3 inches) can be one of the most accurate focusing mechanisms.
TLR
 The
twin lens reflex (TLR) is mostly a camera of the past although many are
still used by professionals, especially in studios. Nearly all are
"medium format" using 120 film on flanged spools. A few such as the
Rollei had adapters for 35mm film (the Rolleikin) that allowed either film
format. A few other smaller models use 127 roll film which
is smaller than 120. Unfortunately the 127 size is no longer made
by the major film manufacturers. It is called a twin lens reflex
because there are two lenses, one for the "viewing" and focusing, and the
other for "taking" the photograph. Unlike a rangefinder or viewfinder,
the two lenses are moved simultaneously for focusing.
The
twin lens reflex (TLR) is mostly a camera of the past although many are
still used by professionals, especially in studios. Nearly all are
"medium format" using 120 film on flanged spools. A few such as the
Rollei had adapters for 35mm film (the Rolleikin) that allowed either film
format. A few other smaller models use 127 roll film which
is smaller than 120. Unfortunately the 127 size is no longer made
by the major film manufacturers. It is called a twin lens reflex
because there are two lenses, one for the "viewing" and focusing, and the
other for "taking" the photograph. Unlike a rangefinder or viewfinder,
the two lenses are moved simultaneously for focusing.
Viewing Screen
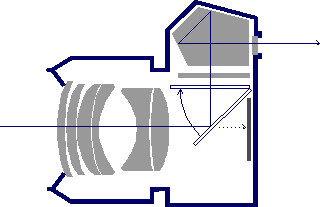
The twin lens reflex body also has two lens systems, one directly above the other. The top one is used for aiming and focusing. It is called the "viewing" lens. The bottom one is called the "taking" lens for taking the photograph. The biggest difference is in the size of image that can be seen and how the focusing works. The image through the viewing lens reflects off of a mirror inside the body and is displayed on a piece of ground glass on the top of the body. Normally there is a small flip-up hood that reduces glare and makes the image easier to see. It also acts as a protective cover for the glass screen when it is closed. Typically the ground glass viewing screen is the same, or nearly the same size as the film. Thus the image is typically much larger, easier to compose and easier to focus as a result. Because the viewing lens the photographer uses is separate from the taking lens the TLR has the same parallax problem as the viewfinder and rangefinder camera bodies. Some parallax correction must be made on close subjects. Also like the viewfinder and rangefinder one does not lose the image when the film is being exposed. The TLR was the predecessor to the SLR in many of its concepts, especially with the mirror and gound glass screen. One final note. The image on the gound glass screen is seen right side up as the mirror corrects for this, however it is reversed left to right. This takes a bit of getting used to as moving left makes the image move right.Focus
[under construction]SLR
 The
single lens reflex (SLR) is the most common 35mm camera body beyond the
pricing of the point & shoot. The 35mm typically has a pentaprism
housing on top of the body. Most current medium format cameras also
have an SLR body. Some look like a large scale version of the 35mm
SLR; others look like a small box with a lens on the front.
The
single lens reflex (SLR) is the most common 35mm camera body beyond the
pricing of the point & shoot. The 35mm typically has a pentaprism
housing on top of the body. Most current medium format cameras also
have an SLR body. Some look like a large scale version of the 35mm
SLR; others look like a small box with a lens on the front. The medium format SLR may or may not have a pentaprism on top. In
an SLR, the image in the eyepiece is seen through the camera lens that
takes the photograph, hence the term "single lens." The photographer
sees exactly (or very nearly) what the photograph will contain as a result.
This is the reason for its popularity among professionals and serious amateurs.
The medium format SLR may or may not have a pentaprism on top. In
an SLR, the image in the eyepiece is seen through the camera lens that
takes the photograph, hence the term "single lens." The photographer
sees exactly (or very nearly) what the photograph will contain as a result.
This is the reason for its popularity among professionals and serious amateurs.
Eyepiece
 A
single lens reflex has only one lens system. It is used for aiming,
focusing and taking the photograph. Thus the SLR presents the photographer
with what the film will see. Most actually show about 95-97% of the
frame the film will see giving a very slight "safety" margin. As
with the TLR, a mirror reflects the image to a ground glass screen above
it.
A
single lens reflex has only one lens system. It is used for aiming,
focusing and taking the photograph. Thus the SLR presents the photographer
with what the film will see. Most actually show about 95-97% of the
frame the film will see giving a very slight "safety" margin. As
with the TLR, a mirror reflects the image to a ground glass screen above
it.
 Most SLR's
come with a screen that has a focusing aid in its center. Unlike
the TLR, there is a prism above that to flip the image left to right and
present it through the eyepiece on the camera back so that it is oriented
as in the scene being photographed. Because there is a single lens
for "viewing" and "taking," the mirror must move out of the way to take
the photograph. The shutter is typically a "focal plane" type behind
the mirror (more details on shutters later) and firing the shutter sets
off the following chain of events in the vast majority of SLR's and SLR
lenses:
Most SLR's
come with a screen that has a focusing aid in its center. Unlike
the TLR, there is a prism above that to flip the image left to right and
present it through the eyepiece on the camera back so that it is oriented
as in the scene being photographed. Because there is a single lens
for "viewing" and "taking," the mirror must move out of the way to take
the photograph. The shutter is typically a "focal plane" type behind
the mirror (more details on shutters later) and firing the shutter sets
off the following chain of events in the vast majority of SLR's and SLR
lenses:
- mirror flips up to move out of the way
- lens stops down to selected aperture (unless it is a specialized lens with manual stop-down)
- shutter fires
- lens stops up to wide open (unless it is manual stop-down)
- mirror drops back down
- mirror flips up to move out of the way
- leaf shutter inside the lens closes (may occur simultaneously with next step)
- lens stops down to selected aperture
- focal plane shutter behind mirror in body opens
- leaf shutter inside lens fires (opens and closes) to expose the film
- focal plane shutter behind mirror in body closes
- lens stops up to wide open (may occur simultaneously with next step)
- leaf shutter inside lens opens
- mirror drops back down